As any previous level, when you enter it, there is a pop up manual. If you were to read it, you’d notice the following info:
Lockitall developers have implemented military-grade on-device encryption to keep the password secure.
This is Software Revision 02. This release contains military-grade encryption so users can be confident that the passwords they enter can not be read from memory. We apologize for making it too easy for the password to be recovered on prior versions. The engineers responsible have been sacked.
Apparently they fired some engineers and introduced military-grade encryption. That sounds so wow. Let’s see what they’re up to.
As always, we start looking at main function.
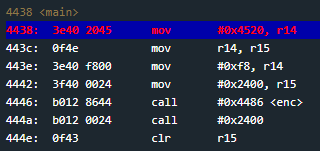
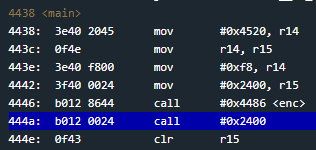
4438 <main>
4438:  3e40 2045      mov	#0x4520, r14
443c:  0f4e           mov	r14, r15
443e:  3e40 f800      mov	#0xf8, r14
4442:  3f40 0024      mov	#0x2400, r15
4446:  b012 8644      call	#0x4486 <enc>
444a:  b012 0024      call	#0x2400
444e:  0f43           clr	r15
We can see it is placing 0xf8 into r14 and 0x2400 into r15. Then it is calling enc function and, 0x2400. As you can see, that second call has no label. That’s indeed strange because if you take a closer look at the code, you will notice there are no instructions starting at address 0x2400 (the memory is full of zeros).
This can only mean that at some point during the program’s execution before the actual call, at address 0x444a, somehow instructions will be placed at 0x2400 in order for the call to make sense. Before inspecting enc function, let’s place a breakpoint at the beginning of main and see what happens.
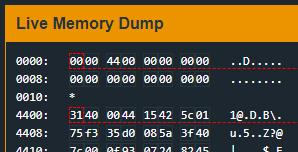
Execute it and inspect the memory. You will notice some changes have been taken place. All of a sudden, instructions at address 0x2400 appeared.
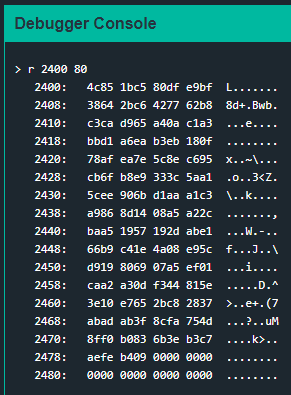
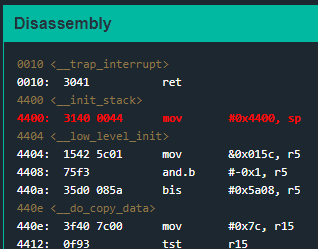
This happens because do_copy_data gets executed before main. do_copy_data copies 0x7c bytes from 0x4538 to 0x2400.
Before main calls this region, enc will do his job. Let’s find out what is it. Since it’s a pretty large function, I’ve splitted it.
4486 <enc>
4486:  0b12           push	r11
4488:  0a12           push	r10
448a:  0912           push	r9
448c:  0812           push	r8
448e:  0d43           clr	r13
4490:  cd4d 7c24      mov.b	r13, 0x247c(r13)
4494:  1d53           inc	r13
4496:  3d90 0001      cmp	#0x100, r13
449a:  fa23           jne	#0x4490 <enc+0xa>
From 0x4486 to 0x449a, the function is placing from address 0x247c to address 0x257c (256 bytes) bytes from 0x00 to 0xff (from 0 to 255). It is starting from 0x00 and incrementing by one each time it points to the next memory address. From 0x4490 to 0x449a there is a loop that gets executed 256 times.
449c:  3c40 7c24      mov	#0x247c, r12
44a0:  0d43           clr	r13
44a2:  0b4d           mov	r13, r11
44a4:  684c           mov.b	@r12, r8
44a6:  4a48           mov.b	r8, r10
44a8:  0d5a           add	r10, r13
44aa:  0a4b           mov	r11, r10
44ac:  3af0 0f00      and	#0xf, r10
44b0:  5a4a 7244      mov.b	0x4472(r10), r10
44b4:  8a11           sxt	r10
44b6:  0d5a           add	r10, r13
44b8:  3df0 ff00      and	#0xff, r13
44bc:  0a4d           mov	r13, r10
44be:  3a50 7c24      add	#0x247c, r10
44c2:  694a           mov.b	@r10, r9
44c4:  ca48 0000      mov.b	r8, 0x0(r10)
44c8:  cc49 0000      mov.b	r9, 0x0(r12)
44cc:  1b53           inc	r11
44ce:  1c53           inc	r12
44d0:  3b90 0001      cmp	#0x100, r11
44d4:  e723           jne	#0x44a4 <enc+0x1e>
44d6:  0b43           clr	r11
Here we have some bytes arithmetic. It is taking bytes from 0x247c and so on, where bytes from 0x00 to 0xff haven been previously placed. We can see it is also taking some bytes from address 0x4472 at instruction 0x44b0. At address 0x4472 lives the ASCII string 0x44a4 to 0x44d4 there is a loop that gets executed 256 times. All this code will be easier to understand at debugging time. It appears, at a first glance, to be enrypting or obfuscating the previosuly inserted 256 bytes.
44d8:  0c4b           mov	r11, r12
44da:  183c           jmp	#0x450c <enc+0x86>
44dc:  1c53           inc	r12
44de:  3cf0 ff00      and	#0xff, r12
44e2:  0a4c           mov	r12, r10
44e4:  3a50 7c24      add	#0x247c, r10
44e8:  684a           mov.b	@r10, r8
44ea:  4b58           add.b	r8, r11
44ec:  4b4b           mov.b	r11, r11
44ee:  0d4b           mov	r11, r13
44f0:  3d50 7c24      add	#0x247c, r13
44f4:  694d           mov.b	@r13, r9
44f6:  cd48 0000      mov.b	r8, 0x0(r13)
44fa:  ca49 0000      mov.b	r9, 0x0(r10)
44fe:  695d           add.b	@r13, r9
4500:  4d49           mov.b	r9, r13
4502:  dfed 7c24 0000 xor.b	0x247c(r13), 0x0(r15)
4508:  1f53           inc	r15
450a:  3e53           add	#-0x1, r14
450c:  0e93           tst	r14
450e:  e623           jnz	#0x44dc <enc+0x56>
4510:  3841           pop	r8
4512:  3941           pop	r9
4514:  3a41           pop	r10
4516:  3b41           pop	r11
4518:  3041           ret
There is an inconditional jump to 0x450c where we have a r14 checking. Remember r14 is set in main at instruction 0x443e. The loop from 0x44dc to 0x450e gets executed 0xf8 (248) times because it is being decremented by one at 0x450a. Also notice that r15 is being used as an offset at instruction 0x4502. r15 was set in main at instruction address 0x4442. This appears to be XORING the previously obfuscated 256 bytes with the data wrote at 0x2400.
As you can see, there is some intense work going on. But 0x444a code placed into address 0x2400 must be already translated into MSP430’s assembly language (opcodes) so the processor can execute it. Let us debug!
Let’s place a breakpoint at address 0x444a, right where call #0x2400 is made. We execute it and insert a bunch of easy recognizable chars.
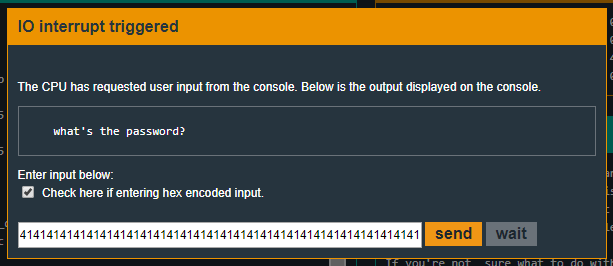
When the
Now, how could we understand what that code is actually doing? We can either learn all MSP430’s ISA and read opcode by opcode or we can use a disassembler. The latter is exactly what we’re going to do.
Microcorruption alreade provides us with a assembler/disassembler here. You can use this one or whatever disassemlber you like. There are also online tools like online disassembler.
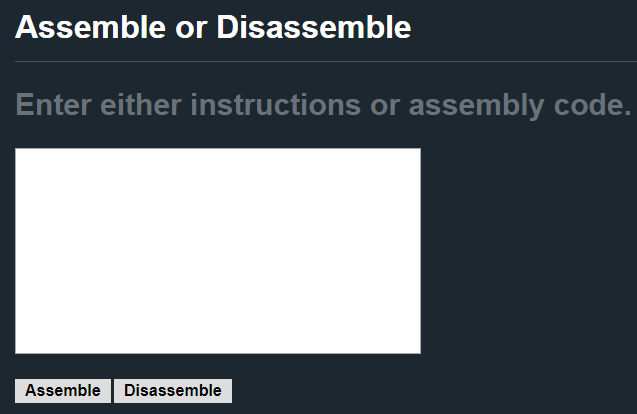
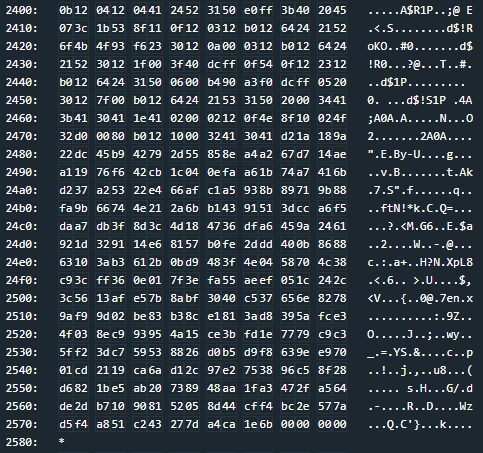
We must paste our bytes and click disassemble. Notice we are disassembling because we want to translate the opcodes into human readable assembly language.
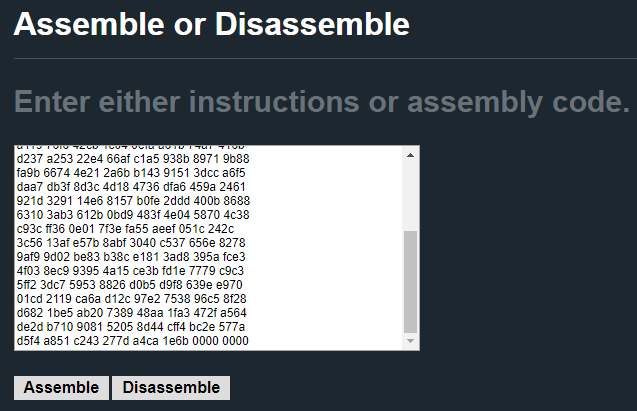
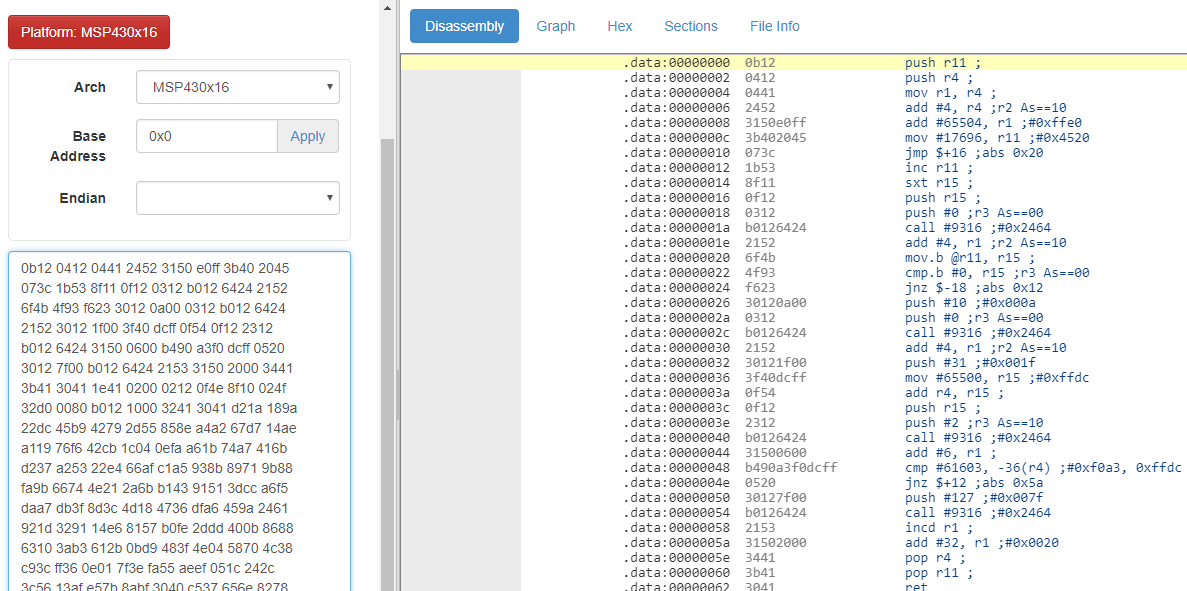
We will get the output of the disassemble.
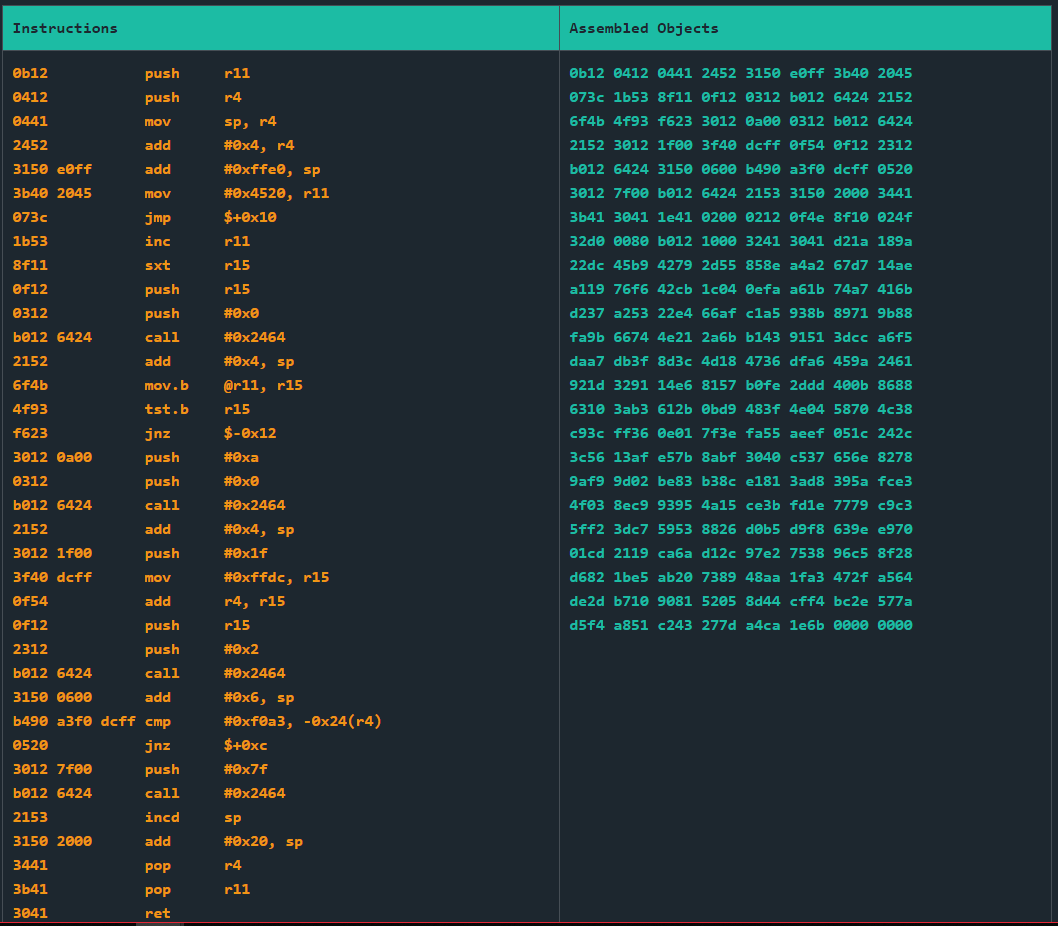
That’s way better than reading pure bytes. Please notice you’d get the same result with any other disassembler.
Now, looking at the code it appears to be extremely large. ret as you will see.
Solution
After disassembling the bytes we’ve previously inspected, we get the following routine:
2400:    0b12           push	r11
2402:    0412           push	r4
2404:    0441           mov	sp, r4
2406:    2452           add	#0x4, r4
2408:    3150 e0ff      add	#0xffe0, sp
240c:    3b40 2045      mov	#0x4520, r11
2410:    073c           jmp	$+0x10
2412:    1b53           inc	r11
2414:    8f11           sxt	r15
2416:    0f12           push	r15
2418:    0312           push	#0x0
241a:    b012 6424      call	#0x2464
241e:    2152           add	#0x4, sp
2420:    6f4b           mov.b	@r11, r15
2422:    4f93           tst.b	r15
2424:    f623           jnz	$-0x12
2426:    3012 0a00      push	#0xa
242a:    0312           push	#0x0
242c:    b012 6424      call	#0x2464
2430:    2152           add	#0x4, sp
2432:    3012 1f00      push	#0x1f
2436:    3f40 dcff      mov	#0xffdc, r15
243a:    0f54           add	r4, r15
243c:    0f12           push	r15
243e:    2312           push	#0x2
2440:    b012 6424      call	#0x2464
2444:    3150 0600      add	#0x6, sp
2448:    b490 11ab dcff cmp	#0xf0a3, -0x24(r4)
244e:    0520           jnz	$+0xc
2450:    3012 7f00      push	#0x7f
2454:    b012 6424      call	#0x2464
2458:    2153           incd	sp
245a:    3150 2000      add	#0x20, sp
245e:    3441           pop	r4
2460:    3b41           pop	r11
2462:    3041           ret
2464:    1e41 0200      mov	0x2(sp), r14
2468:    0212           push	sr
246a:    0f4e           mov	r14, r15
246c:    8f10           swpb	r15
246e:    024f           mov	r15, sr
2470:    32d0 0080      bis	#0x8000, sr
2474:    b012 1000      call	#0x10
2478:    3241           pop	sr
247a:    3041           ret
After a first overview we can clearly see what is of our interest in order to solve the level at addresses 0x2450 and 0x2454. Notice how the code starting at address 0x2464 is just an implementation of INT (interruption) function. Remember that calling INT with 0x7f parameter instantly unlocks the level.
In order to trigger the call, we must not take the conditional jump jnz %+0xc at 0x244e. In order to not take it, the bytes 0xf0a3 must be placed at offset -0x24 from r4.
We want to know what memory address -0x24(r4) translates into . In order to know that, we will set a breakpoint at that instruction and see what r4’s value is. Since we do not see the code section within
When we reach our breakpoint at address 0x444a, we will insert b 2448 in order to place another breakpoint at address 0x2448 and breakpoints in order to see it was indeed succesfully placed.

When the
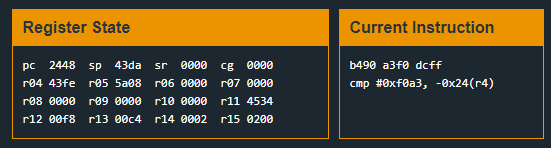
We now know the memory being checked is 0x43fe - 0x24 = 0x43da. If we inspect the stack at this very moment, we’ll notice that 0x43da is the memory address from where our input is saved.

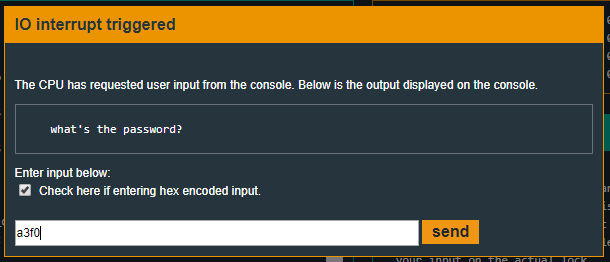
This means that in order to solve the level we must simply input the value 0xf0a3.
So, the solving input (hex encoded) will be:
Recap
In this level we’ve seen how to debug code that is not in our available memory at the starting point of execution. We’ve also seen how to use a disassembler in order to understand that code and know where to breakpoint it.